Category Archives: Gluten Free

Pesto: Summer’s Gift

Standard

There are few things that can compare to home made pesto. It evokes the essence of the garden, all of that basil and garlic… but it also has a richness and depth because of very good olive oil, lots of Parmigiano Reggiano and most importantly pine nuts and pistachios! As my basil plants dictate (it takes ARMFULLS of basil), I make a big batch and freeze it. It does keep well in the refrigerator too, at least 6 weeks.  I never use a recipe, but I paid attention this time to the amounts so you too could make some of the best “green sauce” in the world. If you have a smaller amount of basil, you can divide this recipe. Just remember to taste the pesto for balance and seasonings. It should have a little tang to it and also be rich and slightly crunchy. Some people use other nuts, such as walnuts, but I promise nothing can compare with the combination of pine nuts and pistachios. The are expensive, but really worth it in this instance. And a little pesto can go a long way too! 

Ingredients:  

1 1/2 cups pine nuts

1 1/2 cups pistachios

16 cups of basil leaves and flowers if you have them. I sometimes add parsley and arugula to the mix, but the predominate flavor needs to be basil. 

Zest and juice of three large lemons

3 heads (not teeth, full heads) of garlic, skinned and cut into chunks

1 1/2 -2 cups of good olive oil you judge when the consistency is ideal

2 tablespoons smoked sea salt (non smoked is fine too)

3 tablespoons fresh cracked pepper

1 tablespoon raw sugar

1-2 tablespoons crushed red pepper

3 cups freshly grated Parmigiano Reggiano (you can do this in the food processor ahead)


You will need a food processor for this. If you do not have one, a blender works, but you will have to do it in smaller batches. I have a very large Cusinart, so I do a big batch at one time. 

Method: 

Get all ingredients in place. Toast the nuts in a dry skillet. Do not crowd them too much. I did two batches for this recipe. 

While the nuts are cooling, fill the processor bowl with basil, slightly packed, but not too tight. You should have some basil left over, this will go in after the first part is ground. 

Add the salt, pepper, red pepper, 1 cup of olive oil, garlic, all of the lemon zest and juice. Pulse till the basil is reduced in volume, add the rest of the basil and more oil. The oil and the lemon juice allow the basil to be ground down into a paste. The lemon juice is used for flavor, but also to keep the pesto bright green. Add all of the nuts and process again, adding olive oil as needed to make the paste. Add the cheese and more olive oil as needed. It should be a thick paste, but one that easily drops from a spoon. Once you have it all ground up, taste, add more seasoning if you need it. 

Freeze in containers the size that you are likely to be using it. I find that about 1 cup servings are good for two people. This is great on pasta, pizza, fresh mozzarella, ricotta, crostini, chicken, steak and even on scrambled eggs.  I also like to dip bread sticks in it. However, my favorite way to eat it is over pasta. 

Trip to Indonesia with Shrimp Sate and Peanut Sauce

Standard


Several years ago we were aboard a boat off the shore of Bonaire, a Dutch Territory off of the coast of Venezuela. The island has a huge Indonesian influence because the Dutch once held Indonesia as a colony. We were served this tasty sate and the owner of the boat gave me her simple recipe. It is very easy to make. We had some interesting meals in Bonaire, including Iguana Stew, but I did not ask for that recipe. Sate can be made with pork, chicken, beef or seafood. It is basically slices or in this case, whole shrimp that is marinated in a lemon  & sweet soy marinade, then grilled and served with a peanut sauce. The peanut sauce is delicious on rice or other dishes too. I served  the Shrimp Sate with a cucumber salad and fried rice.

Sate with Peanut Sauce

Yield: 6 appetizer Servings or two entree servings

MEAT
1 1/2 lb Pork, chicken tenders or steak cut into ½ inch strips, 1 pound of fresh shrimp  or for vegetarians use extra firm tofu

MARINADE
2 ea Lemons
2 ea Garlic cloves, diced
4 tb Indonesian soy sauce (this is sweet soy sauce, slightly heavier than regular soy sauce).

PEANUT  SAUCE
4 tb Peanut butter
1 tb Lemon juice
1/2 c Honey
1/2 ts Hot red sauce  (Sambal Orelek or “Rooster Sauce”)
1/4 c Half and half or Coconut Milk (unsweetened)

6 leaves of Kafir Lime slivered and chopped.


Cut chicken meat into strips or peel shrimp. Make marinade by combining juice from lemons with garlic, soy sauce and salt. Pierce meats and marinate 2 to 4 hours. Save the marinade to use in the peanut sauce. Weave meats onto skewers and broil or barbecue until meat is done. Do not overcook.

To prepare the peanut sauce, combine peanut butter, lemon juice, honey and hot sauce with reserved marinade, and heat at low temperature until well blended, stirring constantly. Remove from heat and add half and half. Return sauce to heat and warm through, stirring constantly.

Serve the skewers on platter and pour sauce into bowl. Meat is dipped in the sauce as you eat.

Most WONDERFUL Crispy Okra and Curry Leaf Raita

Standard

My friend Ruta Says: “Odly enough, children in India love okra. But it’s hardly surprising; whether sautéed, fried or stuffed, the vegetable is prepared in a way that makes it’s texture pleasing rather than gooey. In this recipe, for instance, the okra becomes crunchy and addictive on it’s own; stirred into spiced yogurt, it is even better. This can be eaten on it’s own, or served with thalipeeth.”
Ruta wrote the book  5 Spices 50 Recipes, a wonderful play on Indian cooking that makes delicious Indian food accessable for every home cook. Several years ago I was invited to a press dinner at her home in Berkeley, California where we cooked and ate a most amazing meal. I have only changed the recipe slightly, adding a bit more mustard seed and added flavor and crunch of curry leaves. They may be hard for you to come by, but they are available at most Indo/Paki grocery stores. I grow my own. If you cannot find them, the dish is still quite good without them, but even better with them. The flavors and textures in this Raita make my mouth sing. You will want to double the ingredients after you have made this once, it is highly addictive.

Ruta has a new book out now, Quick Fix Indian. There are also rumors that she is planning on a restaurant in Goa where she spends some of her time.

 Ingredients: 

8 ounces fresh or frozen, cut okra

3-4 stems of curry leaf, leaves pulled off of the stems.

6 tablespoons canola oil, divided

1 cup plain whole or low fat yogurt

¾ to 1 teaspoon salt (I used my smoked salt for this)

½ teaspoon sugar or jaggery grated

1/8 teaspoon cayenne (or more if you like a real kick)

1/4 teaspoon ground turmeric (so good for you)

2 teaspoons mustard seeds (I use half golden and half black)

Method:

Wash the okra and towel dry each one thoroughly. Slice into ¼ inch-thick rounds. If using frozen okra, do not thaw.

Heat 5 tablespoons of the oil in a large skillet over medium heat. When the oil is very hot, add the okra, toss and let sizzle. Toss occasionally. The okra will slowly crisp and turn brown. Note: frozen okra may not crisp as well, this is OK, just be sure to brown it well. Once all of the okra is well browned, remove to a paper towel lined platter and set aside till ready to serve. Repeat with the curry leaves. They crisp up really quickly, so keep your eye on them.

Make the tadka: Whisk the yogurt with the salt (to taste) and sugar place the cayenne and tumeric in a small pile on the raita, but do not stir in yet. Heat the remaining tablespoon of oil in a butter warmer or small skillet over high heat. When the oil begins to smoke, add the mustard seeds, covering th pan with a lid or spatter screen. After the mustard seeds stop sputtering, pour the hot oil directly on top of the cayenne and turmeric powder. This cooks the powdered spices without burning them. Do not stir the dressing in yet.

For presentation prior to serving, place the crisp okra & curry leaves on top of the dressing. Stir the okra and dressing into the yogurt while serving. I promise you will be licking the bowl in before the night is over.

Serves 2-4


Grilled Corn and Lobster Chowder

Standard

It is the peak of summer. Time for lobster and corn on the cob. While both are abundant, I decided to make a Chowder on a rainy summer day. It is not hard at all. I used lobster tails that I found on sale and some claws I had frozen for this, but usually I use live lobsters. I always save the shells for stock. This makes enough for 6 servings and reheats well.

Ingredients: 

  • 2 (1 1/2-pound) cooked lobsters, cracked and split (reserve shells) Boil in Spice and Tea Exchange Crab and Shrimp Boil
  • 4 ears corn

For the stock:

  • 6 tablespoons (3/4 stick) unsalted butter
  • 2  yellow onions finely chopped
  • 1/2 cup sherry
  • 1 teaspoon sweet smoked paprika
  • 4 cups whole milk
  • 2 cups heavy cream
  • 1 cup dry vermouth

For the chowder:

Method:

  • Remove the meat from the shells of the lobsters. Cut the meat into large cubes and place them in a bowl. Cover with plastic wrap and refrigerate.
  • Reserve the shells and all the juices that collect.
  • Grill the corn by removing the stocks and silk, spray lightly with olive oil. Grill on medium heat for 2 minutes on each side.
  • Allow the corn to cool, then cut the corn kernels from the cobs and set aside, reserving the cobs for stock. I use a great corn cutter made by OXO. It really works well. There are not a lot of gadgets that impress me, but this one does.

For the stock:

  • Melt the butter in a stockpot or Dutch oven large enough to hold all the lobster shells and corncobs.
  • Add the onion and cook over medium-low heat for 7 minutes, until translucent but not browned, stirring occasionally.
  • Add the sherry and paprika and cook for 1 minute.
  • Add the milk, cream, wine, lobster shells and their juices, and corn cobs and bring to a simmer. Partially cover the pot and simmer the stock over the lowest heat for 30 minutes.

For the chowder:

  • In another stockpot place the shallots, celery and butter or olive oil. Stir until slightly translucent.
  • Add the potatoes, corn kernels, salt, and pepper to the same pot and saute for 5 minutes.
  • Add the flour and stir in and add a ladle full of the stock.
  • Remove the largest pieces of lobster shell and the corn cobs with tongs and discard.
  • Place a strainer over the soup pot and carefully pour the stock into the pot with the potatoes and corn.
  • Simmer over low heat for 15 minutes, until the potatoes are tender. Add the cooked lobster, the chives,  and the sherry and season to taste. Heat gently and serve hot.

Grits in a Rice Cooker: perfection

Standard

We arrived in Charleston to our new home a little over a week ago, though most of my household goods are still en route. I shipped a few things ahead so we would have some basic items. One of those things was my rice cooker. I wanted to make some grits and though that maybe I could do it in the rice cooker. I did it and it was so easy. No stirring and they stayed warm and ready to eat with the warming function on the rice cooker. Here is the way to do it. I of course recommend stone ground grits from the Low Country, or at the very least from the south. The grits I used were purchased at the Charleston Farmer’s Market from Steve Dowdney at The Colonial Charleston Kitchen. This recipe serves four but could easily be doubled and I am sure it would work equally well with polenta.

Ingredients:

1/2 cup stone ground grits
2 cups milk
1/2 cup water
1/2 stick of butter
1/2 teaspoon salt
1/2 teaspoon course ground black pepper

Method:

Place all ingredients in rice cooker on porridge setting and forget about it till you are ready for dinner.


Charleston Farmer’s Market

Standard

Today I got to go to my first Charleston Farmer’s Market. My friend Holly Herrick took me through and introduced me to all kinds of wonderful farmers and producers. I took home a full load of fun things to work with from tomatillos to fresh chorizo. I got a half bushel of those great South Carolina peaches and some stone ground grits from the Colonial Charleston Kitchen.

Image

Image

I had a Vietnamese Five Spice Pork Taco for breakfast

Image

Image

Image

Image

Image

And, the best thing about going to the farmer’s market is what you make for lunch! Two big slices of a “Pineapple” tomato, drizzled with olive oil and sprinkled with smoked salt and fresh ground pepper. Image

Image

 Monday afternoon, James Island has a farmer’s market, so of course I will have to check that out too!

Vidalia Onions and the First Yellow Squash of the Season

Standard

Low Country Squash with Pork Chops and Butter Leaf Salad

For me, it is a right of passage of sorts. I remember back over 30 years ago when as a young bride in the Low Country we had just moved in to a new house on the St. Helena Sound. my neighbor brought me over a little brown paper sack filled with yellow squash. She told me to go to the Piggly Wiggly and buy a “mess” of Vidalia Onions and explained this very simple recipe. Every spring I make this and think of the gift that Belle gave me. These two vegetables which appear at the same time every spring in the South will always be a perfect pairing in my mind. You can use any sweet onion to make this. Fortunately I had the amazing luck to come upon a shipment of Vidalias here in Hawaii. I grabbed them up and have been making all kinds of good things with them. But when I was at the farmer’s market and saw this yellow squash, I had to make this.

The recipe is embarrassingly simple and I am sure you will love the velvety texture that is the result.

Vidalia Onions and the First Yellow Squash of the Season

3 Vidalia or other sweet onions sliced

3 tender yellow squash sliced

3 cloves of garlic finely minced

Olive oil

Salt and Pepper to taste

Freshly grated Parmesan

In a generous skillet, heat the olive oil and put in the squash in an even layer. Brown and turn.

Add the onions and stir, sautee till the onions start to sweat.

Clean a hot spot in the center of the pan and add  the minced garlic. Stir again.

When the onions turn translucent and just start to brown, add the cheese and stir till it starts to melt.


Add salt and pepper.  Serve immediately.


Polenta and Furikake Crusted Vidalia Onion Rings

Standard


image
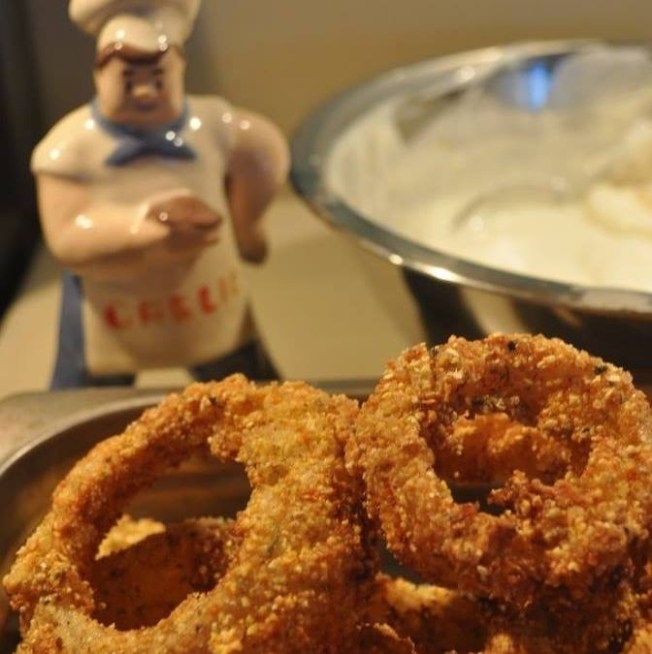
It is that magical time of year when Vidalia onions appear in the markets. Yes, even here in Hawaii, home of the Maui Onion (which is almost as sweet) we get Vidalias. I have been making cornmeal crusted onion rings for a long time, but I decided to change it up a little by using Greek yogurt instead of buttermilk to soak my onion rings in and to add Furikake  to the Polenta. In this recipe I used a course ground Polenta which added a lot of texture. You could also use stone ground grits for this. Furikake is a Japanese seasoning used to spice up plain rice. I use it for lots of things and love adding it to the panko crumbs when making fish. My favorite Furikake is wasabi, sesame and nori. It ads little pops of flavor in the crust.

Ingredients: 

2 cups of Greek Yogurt, thinned with 1/2 cup of milk

4 large Vidalia onions

2 cups coarse polenta

1/2 cup all purpose flour (or rice flour if you are gluten free)

1/4 cup Firikake

plenty of fresh cracked pepper

1 teaspoon of salt

Peanut oil for frying


Method:

  • Slice onions into thick slices, place the slices in the bowl of yogurt and milk and allow to rest for 30 minutes
  • Mix all other ingredients except oil in a shallow container
  • Heat oil to 350
  • Pull out slices of onion and shake off excess yogurt but allow a bit to remain
  • Dredge the onion slices in the breading, making sure it adheres to the onion slices
  • Fry the onions, 6 or so slices at a time for about 3 minutes, draining on a grid.
  • Serve immediately

I like to make a chipotle mayo for dipping. In a small blender mix 1 cup of mayonnaise with half a can of  chipotles. (freeze remaining peppers for another use) Blend till they are combined.