Category Archives: Vegan

Roasted Chicken with Jerusalem Artichokes, Olives and Meyer Lemon

Standard

best shot

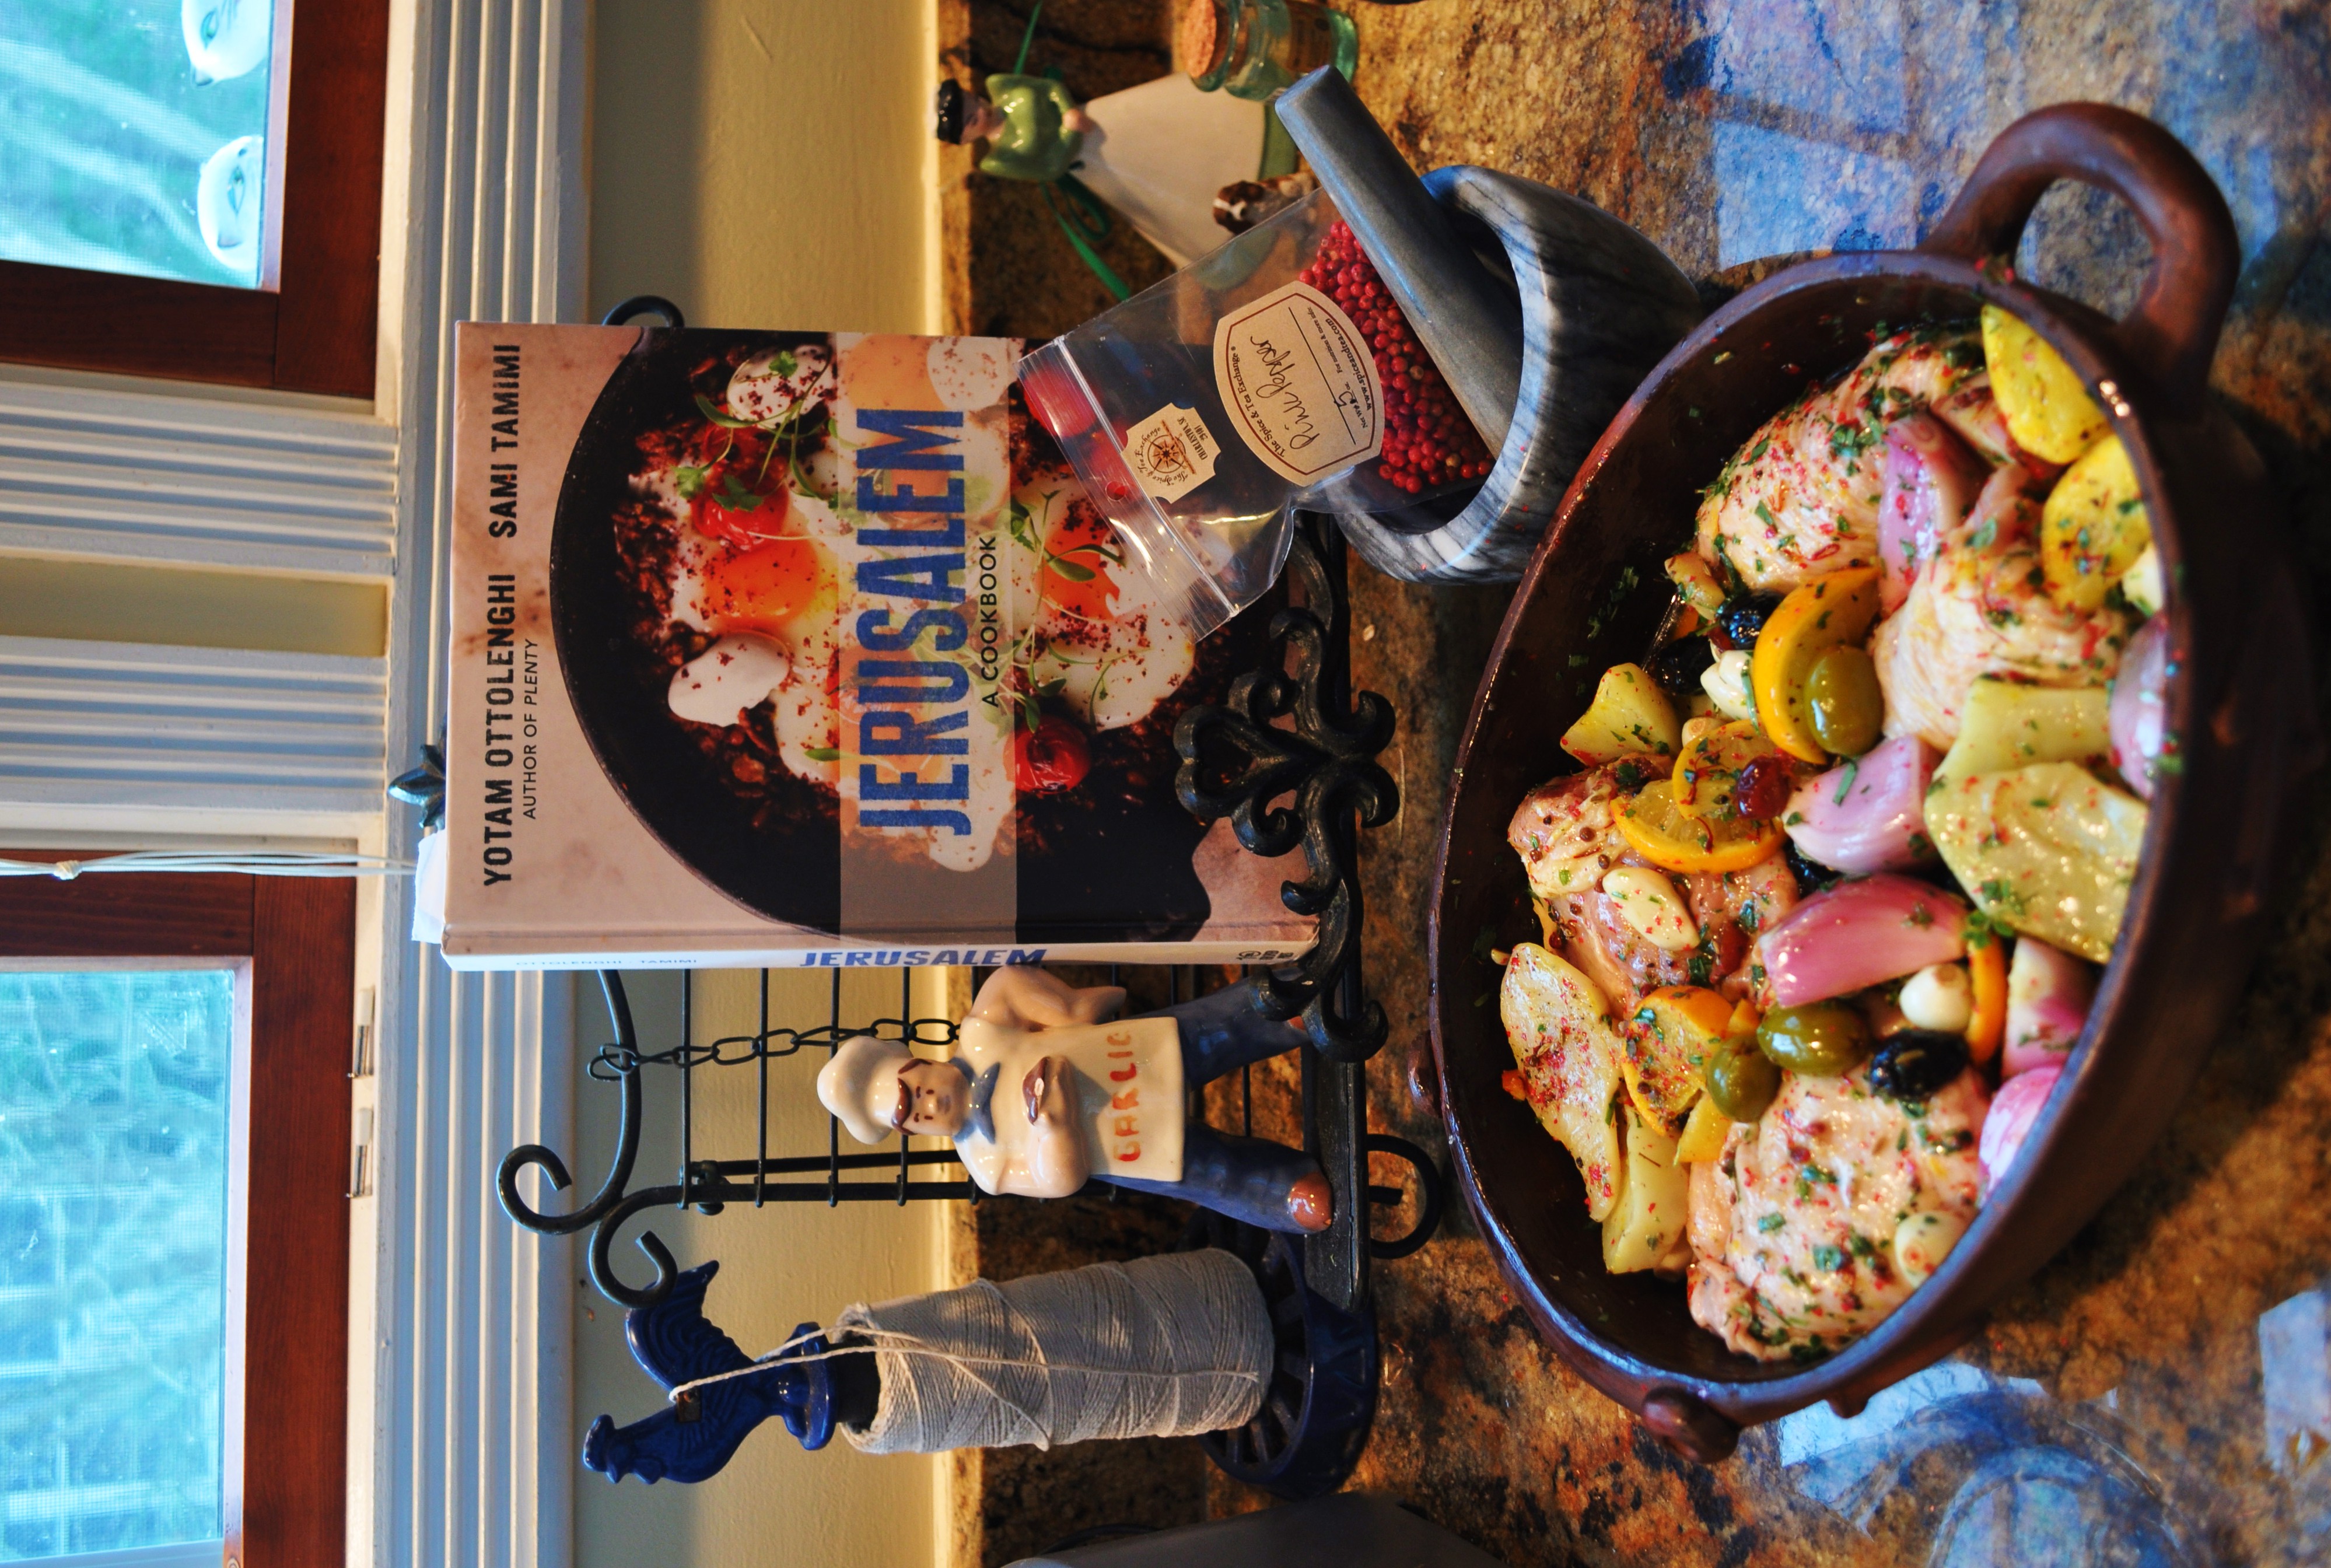
This dish is simple and yet one of the best dishes I have ever made. The flavors come bold and subtly, rich and satisfying and engagingly interesting at the same time. The inspiration came from Jerusalem by Yytam Ottolenghi and Sami Tammi. I added Meyer lemon, olives (black oil cured and green pitted) and used half of the chicken of their recipe. I also used more olive oil and less water than their recipe. So you can just add more chicken if you want to serve four people. You can Also use a whole chicken cut up instead of thighs.

Before oven

Ingredients:

  • 1 # Jerusalem artichokes (sun chokes) peeled and cut into quarters
  • 3 tablespoons lemon juice (I used Meyer, but any lemon juice is fine)
  • 4 bone in chicken thighs
  • 6 large shallots cut in half
  • 12 cloves garlic peeled
  • 2 medium Meyer Lemons, cut in half and then sliced thinly (you can use other kinds of lemon)
  • 1 teaspoon saffron
  • 1/4 cup olive oil
  • 1/2 cup cold water
  • 2 tablespoons pink pepper berries crushed
  • A hand full of olives (I used black oil cured and green)
  • 1/4 cup fresh thyme leaves (I used lemon thyme)
  • 1 cup (yes that is a lot) fresh tarragon leaves, chopped
  • 2 teaspoons salt (I used Murray River)
  • 1/2 teaspoon freshly ground black pepper corns

DSC_0006

Method:

  • Put the chokes in a sauce pan, cover with water and add half of the lemon juice. Bring to a boil and then simmer for 10 minutes, the chokes should be just barely cooked. Strain and allow to cool.
  • Mix together all of the remaining ingredients reserving 1/2 of the tarragon.
  • Put the chicken in a bowl and pour everything over the chicken and chokes.
  • Chill for 1-24 hours. I only marinated for 1 hour and it was extremely flavorful.
  • Preheat the oven to 475 degrees
  • Place the chicken skin side up in a roasting pan or clay pot
  • Spread the remaining ingredients all around the chicken
  • Roast for 30 minutes, then cover with foil and roast another 15 minutes.
  • Remove from the oven and allow to rest for 5 minutes, then serve with the reserved tarragon sprinkled on top.

DSC_0011

Crusty bread is good with this as there are fantastic brothy juices.

Advertisement

Easy Tabbouleh (Tabouli)

Standard

Tabouli

This is such a nutritious and delicious thing to have on hand. It can be served with grilled pita bread, rustic breads, slices of radishes, carrots or cucumbers or eaten as a salad on its own. There are a lot of recipes out there, this one is based on a Palestinian version, basically a parsley salad. Chop and stir! This keeps for about a week in the refrigerator. I used fresh and dried parsley to get different levels of flavor.

Ingredients:

  • 1/2 cup fine bulgur wheat, soaked for 2-4 hours in boiling water, then strained
  • 1 pound of grape tomatoes, finely chopped
  • 1 large shallot finely chopped
  • 4 Tbs fresh lemon juice
  • 2 large bunches fresh flat leaf parsley finely chopped
  • 1/2 cup dried parsley 
  • 2 large bunches mint (not peppermint) finely chopped
  • 2 Tbs Baharat seasoning (see below)
  • 1 Tbsp Sumac (more if you prefer)
  • 1/2 cup good olive oil
  • freshly ground black pepper (I use a four peppercorn blend)
  • Sea salt to taste

Baharat Spice Mix

To make spice mix: Toast all but the nutmeg in a dry pan, being careful not to burn. Use a spice grinder or mortar and pestle to grind to a fine powder).  Add the nutmeg and stir. Keeps for 8-10 weeks

To make Tabbouleh:

Add all ingredients in a large bowl and stir. Taste before adding salt and pepper. Serve with additional lemon quarters.

Pineapple Cucumber Gazpacho

Standard

pineapple 1

This is so easy and so delicious… completely refreshing.

2 cups fresh (must be fresh) cubed pineapple

2 cups chunked peeled English cucumbers (no seeds)

1 cup pineapple juice

2 tablespoons olive oil

3 sprigs fresh mint, torn

1 finely chopped jalapeno

3 tablespoons finely chopped onions

1/4 cup chopped macadamia nuts

Place all in a blender and pulse till well blended but still a little chunky

Serve  with additional nuts on top or a sprig of mint.

This will keep up to a week in the refrigerator.

pineapple 2

Roasted Balsamic Cherries

Standard

Really good cherries are hard to beat for flavor and beauty. This application is something that goes well with duck, pork  or chicken as a side dish, but also is good as a dessert over ice cream. It is super simple. You just have to find some really super cherries! I got mine from Whole Foods just as the cherry season was beginning.  I used bing cherries but any large firm variety would work for this.

Start with firm ripe cherries

Start with firm ripe cherries

1 lb of cherries,(don’t  pit or remove stems)
2 Tablespoons olive oil
1/4 cup good quality balsamic vinegar
Whole nutmeg, grated
Fleur de Sel salt and coarsely ground black pepper to taste 

1. Preheat the oven  to 400°F.

2. Rinse the cherries with cold water and pad them dry gently with a kitchen towel.

3. Place cherries in a bowl and toss them with olive oil and balsamic vinegar, and season generously with salt and pepper.

4. Transfer cherries to a non-reactive baking dish (glass or porcelain are ideal) with the stem standing up. Preferably, the cherries will fit really close to one another. Cover the baking dish with aluminum foil.

5. Roast the cherries in the oven for 20 minutes or until they start to release their juices. Remove the foil, and place the baking dish back in the oven for another 5 minutes to allow the juices caramelize a bit.

6. Remove from the oven and let them sit for 5 minutes. Serve cherries as desired spooning some of the juices over the cherries.

Roasted Cherries

Carrot Pickle

Standard

carrot pickle

I adore Indian food. The spices, bright colors and flavors could sustain me and bring joy to my palate for eternity. I never tire of the  deep rich combining of so many ingredients to make one dish. Carrot pickles are one of those complexly layered side dishes that not only delight visually, but also in flavor. There are lots of ingredients, but once you have them all measured out, it only takes a few minutes to make these and they keep for at least two months in the fridge if you don’t share them. The problem I have is when people tastes them, they just want more and more and soon they are gone.

My friend and writing mentor Monica Bhide shared my recipe for Carrot Pickle in the Washington Post a few years ago. Not much has changed in my recipe. It is a classic that everybody raves about.

Carrot pickle mise en place

Carrot Pickle  

Ingredients:

8 carrots, peeled and cut into julienne

¾ cup canola oil

1 small onion, roughly chopped

1 2 inch piece of ginger, peeled and rough chopped

4-6 small red chiles (depending on how hot you like it)

6-8 cloves of garlic

3 tablespoons mustard seeds (I use brown, but black is fine too)

1 tablespoon methi (fenugreek) seeds

1 tablespoon of cumin seeds

1 tablespoon coriander seeds

1 tablespoon of fennel seeds

A hand full of curry leaves

2 tablespoons urad dal

1 teaspoon chili powder (hot)

1 tablespoon turmeric

A pinch of hing

4 tablespoons grated jaggery (or Thai palm sugar)

1 teaspoon sea salt

3 tablespoons vinegar (apple cider or white vinegar)

Method:

Lay carrots on a thick towel and roll and squeeze to remove all the water.

Puree the onion, ginger, chiles and garlic together in a food processor or mortar and reserve.

In a wok, heat the oil.. Add mustard seeds, methi seeds, urad dal, cumin and fennel seeds.

When they sputter, add 1 large onion, a chunk of ginger, and 4-5 garlic cloves that have been pureed together.

Throw in the curry leaves and fry the mixture until light golden brown. Lower the heat and add chilli powder, turmeric, cumin powder and a pinch of hing.

Add jaggery and salt.

Turn off the heat and add vinegar. Taste and adjust the spices – you want it to be hot chilli wise, but slightly sweet and sour from the sugar and vinegar. Mix in the carrots, place into a clean glass jar and store in the fridge. This will keep for several weeks. The recipe can be doubled so you can share some!

Pepita Granola

Standard

Granola 3

I have been making granola forever, it was probably one of the first foods I made in my adult life as a cook. When I was in cooking school in Cuernavaca, Mexico we had some with pepitas (pumpkin seeds) and since then this has been my favorite recipe. My favorite way to eat granola is on top of fresh Greek style yogurt with some fresh berries or fruit. This is very easy to make and far better than most store bought versions. I do not add dried fruit to the granola until serving as it tends to soften the granola, but this goes nicely with dried fruits as well as fresh. You can also store granola in the freezer to prevent softening.

granola 1
This recipe was adapted from Calle Ocho in New York City.

Pre-heat oven to 375 degrees.

6 Cups old fashioned rolled oats
1 1/2 cups hemp seeds (available at health food stores)
2 Cups unsweetened flaked coconut
1/2 cup vegetable oil (you can use pumpkin seed oil if you have it)
1/2 cup sliced almonds
2 cups green hulled pepitas (pumpkin seeds)
3/4 cup local honey
1/4 cup molasses
1/2 cup maple sugar
sprinkle of nutmeg and cinnamon
pinch of salt

granola 2

Mix all in a very large bowl. Bake on baking sheets lined with parchment or silpat for 15minutes, remove from oven and stir well, then bake for another 10 minutes. If the granola is browned, remove from the oven. If it is not browned, stir and put in for another 5 minutes. When golden brown cool, then place in airtight containers.


Grilled Pink Grapefruit

Standard

Grilled grapefruit on salad

I have two grapefruit trees. Both are heavy with yellow and pink orbs. So, when I was grilling chicken the other night, I decided to see what would happen if I grilled some. The results were amazing. The heat brought out the juices in the already juicy fruit and set the sweetness soaring. I used the wonderful Salted Caramel Sugar from The Spice and Tea Exchange of Charleston where I work, but you could use Sugar in the Raw with success.

grapefruit peeled

All you have to do is remove the skin and pith from the grapefruit, this is achieved in much the same way as doing orange supremes. Cut off the top of the grapefruit so you can clearly see where the pith meets the fruit. Then do the same on the bottom. Using a sharp knife, cut away the pith and skin in slices (you can save these for twists in your beverages) and once you have removed the skin, cut thick slices and place on a plate.

grapefruit slices

Just before grilling, top with the sugar and place the unsugared side on the grill. It only takes a few minutes to get grill marks. Flip and sugar the grill marked side. When the sugar has melted and started to caramelize, remove and serve immediately or cool and cut into quarters for salads.

Chicken Orzo Salad grapefruit

Prickly Pear Sorbet

Standard


This recipe is quite simple. You will need an icecream maker of some kind, but even the very inexpensive ones work well for this. You will also need a fine sieve.

8 Prickly Pears (they call these Tuna) in Mexican markets. They come in yellow, orange and pink. My favorite is pink.

1 cup of simple syrup (half water/half sugar till sugar melts) or light agave syrup. Sometimes I put fresh mint in the syrup too.

Juice of three limes

1/4 cup raspberry liqueur  such as Framboise. This step can be eliminated if you do not want the liquor.

Often times you can find these pears growing wild and in gardens. In Mexico they also candy them. In Italy they are used to make gelato ad sorbet in the fall.

When making your simple syrup, you can add spices, in this case I used one cardamom pod, mint, a cinnamon stick and 3 star anise. These just flavor the syrup slightly.

Using a fork, cut off the ends of the prickly pear. Commercial pears like you would find in a hispanic grocery will have the little prickles removed. If you harvest them your self, you will need to be more careful. Hold the fork on one end, stand the pear on the other end and using a sharp knife cut just the skin from the pear. Then cut into large chunks and place in a food processor. Pour in the simple syrup, lime and liqueur. Pulse until the mixture is smooth.

Strain carefully, there are a lot of seeds inside. Cool the mixture.

Process as you would in any ice cream or gelato machine. Pack tightly in freezer containers. It will be ready to eat within a couple of hours.

Refrigerator Pickles: Easy Bread and Butter Cucumbers and Okra

Standard


Easy, delicious and a perfect way to preserve some of the last of this summer’s produce, in this case some cucumbers and okra. Refrigerator pickles are great, crispier and fresher tasting than their canned cousins.  This is a recipe that is both sweet and tart, much like Bread and Butter Pickles. Put them on your burgers, alongside sandwiches and use the okra in Bloody Marys. Add them to a cheese plate or charcuterie platter. It is SO easy and you do not need a whole bushel of produce and lots of equipment to make these, just some clean jars, a knife (or food processor) and the ingredients. Here is the recipe to make 3 quart jars. It only takes about 30 minutes working time to do these. Well worth the effort.

Ingredients:

2 onions, thinly sliced

8 medium cucumbers thinly sliced (I used the food processor to make fast work of slicing)

4 cups okra ( I did the okra in one jar and the cukes in two others, but you could do more cukes if you are okra adverse).

3 cups of water

3 cups of cider vinegar

6 cups sugar

1 tablespoon kosher salt

2 tablespoons mustard seeds

2 1/2 teaspoons turmeric

2 teaspoons celery seeds

2 tablespoons pickling spice

2 teaspoons grains of paradise

2 teaspoons juniper berries

crushed red pepper to taste

6 cloves of garlic (2 per jar)

6 sticks of cinnamon (2 per jar)

Method: 

Slice cucumbers and okra.

The food processor makes slicing a breeze and maintains consistent size

Place in a jar with 2 sticks of cinnamon and 2 cloves of garlic slightly bruised

Pack the jars tightly

Pack the jars tightly. This can also be done in a plastic container.

Cook all remaining ingredients to a boil and then simmer for four minutes. Allow to cool for 5 minutes. Pour the pickling liquid over the vegetables and close jars. Allow to cool completely, then place in refrigerator. The pickles will be ready to eat in 24 hours. You can use a variety of vegetables to make pickles, peppers, carrots, jicama, sugar snap peas, asparagus, okra, even peaches.

The Ultimate Maraschino Cherry: Homemade!

Standard

I am tired of ingesting sappy sweet Maraschino Cherries loaded with red dye #40. I want some *real cherries* for my manhattans and Mai Tais! And so, I made Homemade Maraschino Cherries. There are two ways to make them (that I know of) and one of them requires sourcing  Luxardo Maraschino Liqueur .I will be posting about those soon.  If you are not looking for a spiked cherry, why not just make them the old fashioned way? Basically this involves taking fresh cherries at their peak, creating a syrup adding some spices and flavors that will compliment the cherries, then simmering the cherries lightly in the syrup without really cooking them completely. This enables the flavors of the syrup to penetrate the cherries and still retains the texture of a fresh cherry.

Which would you rather have?

Commercial Maraschino Cherries are typically made from light-colored sweet cherries such as the Royal AnnRainier, or Gold varieties. In their modern form, the cherries are first preserved in a brine solution usually containing sulfur dioxide and calcium chloride to bleach the fruit, then soaked in asuspension of food coloring (common red food dye, FD&C Red 40), sugar syrup, and other components. Green maraschino cherries use a mint flavoring.

This recipe is simple and can be completed in the space of an hour. When the cherries have been soaking in the syrup even longer, they will be even tastier. I did not pit the cherries and I left the stems in tact, but you can pit them if you want to. You will need a large jar or container to store the cherries in. They do need to be refrigerated. The alternative of course is to process the cherries, but then they would lose so much of their fresh taste and texture.

These cherries are not just good… they are DAMN GOOD! Try it, really, it is so worth it!

Home Made Maraschino Cherries

2 cups pomegranate juice (use 100 percent juice)
1 cup sugar
3 1/2 ounces fresh lemon juice (from approximately 3 lemons)
Pinch of salt
3 whole pieces star anise
8 whole cloves
1 pound sweet cherries
1 teaspoon almond extract
In a nonreactive saucepan, add juice, sugar, lemon juice, salt, cloves and star anise. Place over medium-high heat and bring to a boil. Reduce the heat and simmer the mixture until the sugar has dissolved.
Add the cherries and almond extract. Simmer on low heat for 10 minutes or until the cherries have exuded some of their juice and the syrup has taken on a distinctly cherry flavor. Be careful not to overcook. The point is not to actually cook the cherries, but to heat them in the syrup just long enough to bring out their essence.
Remove the pan from the heat, transfer the cherries and the syrup to a bowl a container with a tight-fitting lid, cover tightly, and refrigerate. The longer the cherries steep, the more flavorful they will become.
The Ultimate Manhattan:
I had my first Manhattan at the bar of Tavern on the Green (which incidentally went from being the nations second highest grossing restaurant in 2007, to closing due to bankruptcy in 2009) on my inagural  trip to New York in 1997. I ‘ve loved them ever since. I have returned to Manhattan several times since then, both in my heart and in person, I always order Manhattans when I am there.  It’s a sophisticated, strong and simple cocktail, and the ultimate showcase for as many maraschino cherries as you care to pack into your glass. The proportions are 2:1 
Makes 1 drink
3 ounces whiskey, rye or Bourbon
1 1/2 ounces sweet vermouth
2-3 dashes Angostura bitters
Maraschino cherries, for garnish
In a double old fashioned glass, add the whiskey, vermouth and bitters, stir. Garnish with maraschino cherries and serve on the rocks. The drink can also be served straight up by using a cocktail shaker and straining into a martini glass.