Tag Archives: recipes

Pozole Rojo in an Instant Pot

Standard

Pozole 2

When I was in cooking school in Mexico, we went to Taxco, the “silver city” often. I had also been there many times when I was growing up. The hillside town has silver mines and many silversmiths catering to shoppers. With every visit we would go to the Pozolerias for lunch or dinner. If we were lucky,  we would be there on a Thursday we could get the Pozole Verde (green). On other days there was Pozole Rojo (red) and Blanco (white). Traditionally Pozole was made with pork. I know this is gross, but back when the Aztecs were sacrificing humans, they even used human flesh and later, pork tasted more like human flesh. Over the centuries it has developed into a regional stew with pork, chicken or even vegetarian ingredients.

Pozole is the Mexican name for treated corn, also known in the US as hominy. Since maize was a sacred plant for the Aztecs and other inhabitants of Mesoamerica, pozole was made to be consumed on special occasions. The conjunction of maize (usually whole hominy kernels) and meat in a single dish is of particular interest to scholars, because the ancient Americans believed the gods made humans out of masa (cornmeal dough).

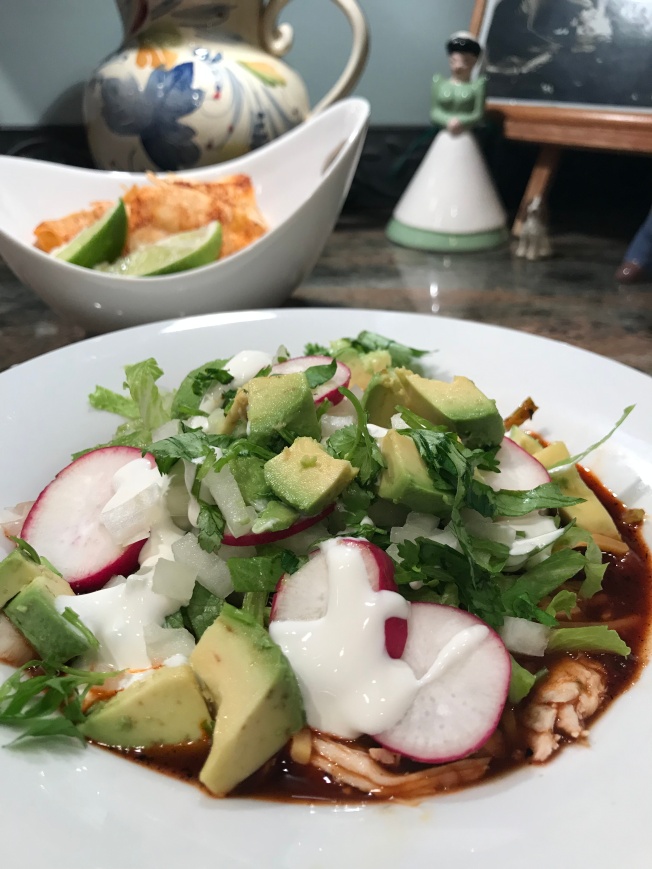
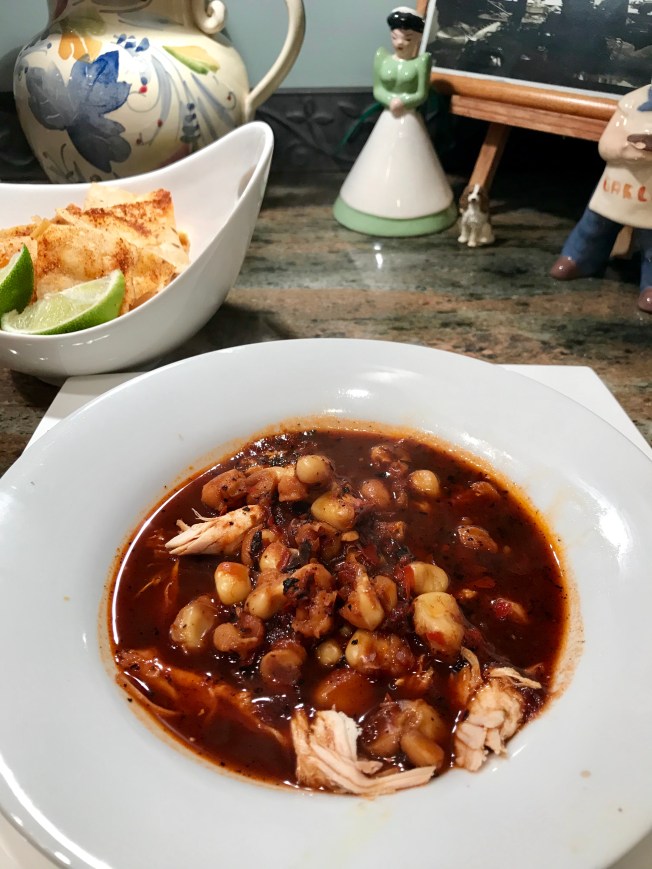
This recipe is for the rojo pozole with chicken and it includes home made stock as well as an abundance of dried chiles. In this case I used ancho and guajillo which make a rich and delicious stew.

When pozole is served, it is accompanied by a wide variety of condiments, potentially including chopped onion, shredded lettuce or cabbage, sliced radishes, avocado, lime, cilantro, tostadas (freshly cooked tortilla chips), Mexican Crema and/or chicharrones (fresh fried pork skin).

While this recipe is developed for the Instant Pot, it can also be made in a dutch oven or pasta pot. The cooking time will be much longer.

A note about the hominy/pozole: This can be made with canned hominy, but I suggest you take the time to soak and make your own. It will have much better texture and flavor. You can buy prepared hominy by Rancho Gordo, however, it is smaller than the kind purchased in Hispanic Markets or the kind you will make yourself.  Both will need to be soaked over night and cooked in the stock for about 30-50 minutes in the IP.  If you are cooking in a regular pot it will take 2-4 hours depending on the kind you are using. The Rancho Gordo Hominy takes less cooking time because of the size of the kernels. If you really want the original flavor you can buy large heirloom corn from Anson Mills (my favorite heirloom provider) and make your own. It is an extra step, but well worth the effort. Directions can be found here: How to make Hominy from Corn.

Pozole1

Ingredients: 

  • Chicken stock made from a whole chicken
  • Breast  and thigh meat from the chicken, reserved
  • 2 cups of dry hominy soaked for 8-10 hours
  • 6 ounces each of dried Ancho and Guajillo chiles
  • 1 onion cut in large chunks
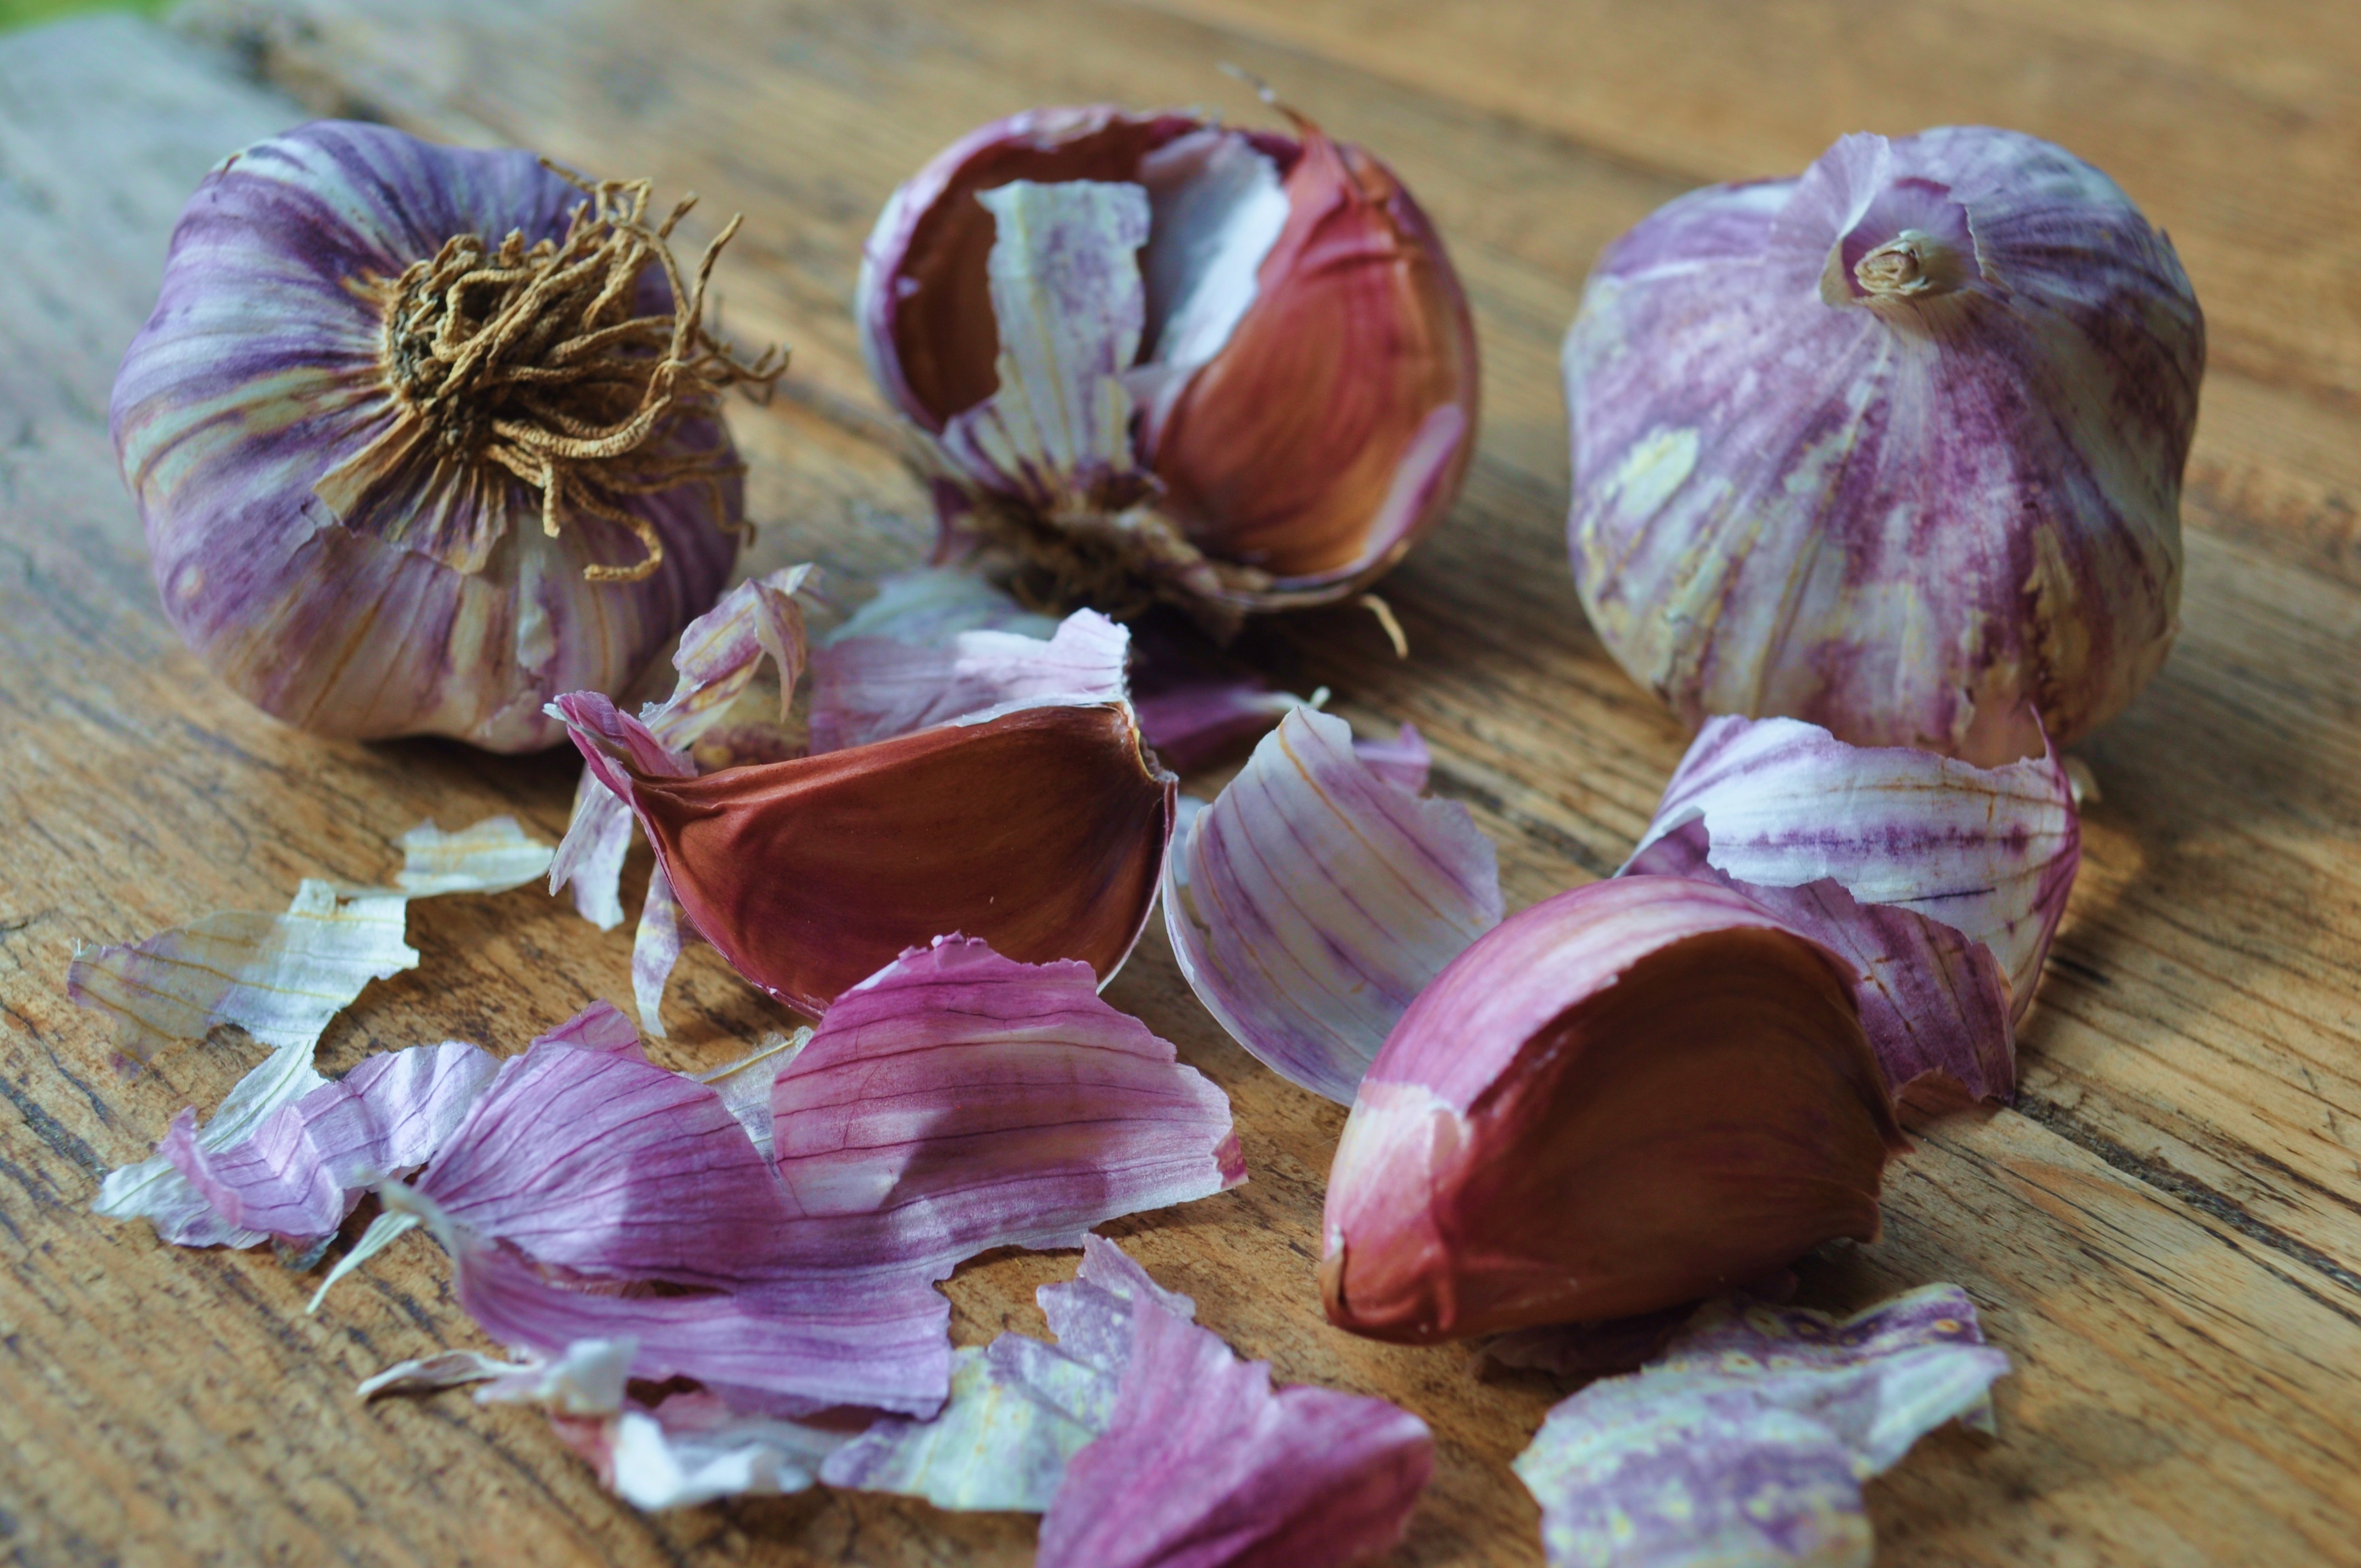
  • 8 cloves of peeled and smashed garlic
  • 1 tablespoon of Mexican Oregano (or marjoram)

Method: 

Chiles1

  • Drain the hominy and rinse.
  • Put the hominy in the Instant pot and cover it with stock, about 3″ above the hominy.
  • Cook on the bean function for about 30 minutes if using Rancho Gordo Hominy, 60 minutes if you are using the Mexican Pozole. Check for doneness. It should be somewhat al dente, but not tough or difficult to bite into. Avoid over cooking it to retain integrity of the kernels.
  • While the hominy is cooking,  use a large skillet to toast the chiles in even batches. When toasted, break open and remove seeds and stems. Put them in a blender with the garlic and onion.
  • When the hominy is cooked, take off about 1 cup of the stock and pour it into the blender and puree the chiles till smooth.
  • Pour the blender contents into the Instant Pot, stir in oregano and seal. Cook on Bean setting for 15 minutes.
  • To serve, put some of the chicken into bowls and ladle the pozole over it.
  • Serve with garnishes mentioned above.

Pozole3

Join me on Facebook!

Advertisement

Ricotta Gnudi with Mortadella Polpetti and Nona’s Fresh Tomato Sugo

Standard
mortadella

Artisan Meat Share Mortadella

Ever since I saw Craig Deihl’s post on Facebook, showing his house made mortadella at Artisian Meat Share, I have been looking forward to trying it. I am inspired by Chef Ken Vedrinski’s (Tratoria Lucca) Ricotta Gnudi with Mortadella Polpetti (little meatballs). Tratoria Lucca is one of my favorite Charleston restaurants and the reason is Ken Vedrinkski. He is a hands on chef owner who absorbs himself in his cuisine in a way that most chefs simply do not hold a candle to. He sources many Italian delicacies on his frequent trips across the Atlantic, finding the most special olive oils, wines and cheeses to bring  back to Charleston. He also has special relationships with fishermen, ranchers and farmers who bring their goods to the back door of his restaurant.

Ken-Vedrinski

Gnudi are gnocchi-like dumplings made with ricotta cheese instead of potato, with very little or no flour. The result is often a lighter, “pillowy” dish, unlike the often denser, more chewy gnocchi.

There are three elements to this meal, they come together in a perfect symphony of flavor and texture.

Tomato Sugo Ingredients:

  • 1/2 cup olive oil
  • 1 generous pinch crushed red pepper
  • 8 plum tomatoes, peeled, seeded and crushed
  • 10-12 cloves of garlic, finely minced
  • 1/2 cup of butter
  • Salt to taste

Method: 

  • Place olive oil in a pot over medium heat.
  • Add garlic and chili flakes
  • Saute 2-3 minutes
  • Add tomatoes and butter, blend well and add salt to taste
  • Reduce heat, cover and simmer about 30 minutes. Remove from heat.

Butter in the sauce

Mortadella Polpetti Ingredients: 

  • 4 slices of day-old ciabatta, crust removed
  • 2 cups milk
  • 5 ounces ground pork
  • 5 ounces ground mortadella (if you cannot find it, then use good quality bologna and finely chopped pistachios along with some black pepper)
  • 1/4 cup porcini powder
  • 1 large egg
  • 1 cup ground Parmesan
  • 3 tablespoons chopped flat leaf parsley

Method:

  • Soak cubes in milk for 5 minutes,then squeeze dry.
  • In a large bowl add remaining ingredients until well combined. Cover bowl, then refrigerate 1 hour.
  • Form Polpeti into 1 inch balls.
  • 45 minutes before serving time, add the polpetti to the sauce and put on a simmer burner at very low temp.

Meatballs cooking

Gnudi Ingredients: 

  • 16 ounces good quality fresh ricotta
  • 5 ounces microplaned Locatelli Pecorino Cheese
  • 1 egg
  • 1 egg yolk
  • 2/3 cup 00 flour (available at Italian specialty stores or online), plus more for dusting.

Gnudi Method: 

Gnudi before boiling

  • Mix all ingredients in a large bowl till a dough forms. Be gentle when mixing. cover bowl and chill for 1 hour
  • Dust the bottom of a sheet pan with flour.
  • Place dough on a floured work surface and roll into a 1 1/4 inch diameter log. cut on the bias into one inch pieces.Place on the floured surface
  • Bring a large pot of salted water to boil
  • Shake extra flour from gnudi. gently place in the pot cooked till cooked through. Put in a bowl and toss with the sauce.
  • Serve with freshly grated parm.

gnudi in sauce

Pomegranate and Blueberry Pancakes

Standard

Pomegranate pancakes 4

These are one of my favorite fall/winter breakfast dishes…. each bite bursts with flavor and they are full of antioxidants too. As soon as my pomegranates are ripe I start making things from them and this is just one of many things I like to do with them. I sometimes make them with sourdough starter, but you can also use buttermilk and flour as I give instructions for here. I use good Vermont Maple Syrup on the side. You can change out the fruit, but I really think this is an amazing combination. Bacon on the side is a perfect compliment. Bring on the Mimosas!

Ingredients:

  • 2 cups self rising flour (White Lily preferred)
  • 2/3 to 1 cup of buttermilk
  • pinch of salt
  • 2 eggs
  • 2 tablespoons of melted butter
  • 1 cup of blueberries
  • 1 cup of pomegranate

DSC_0004

Method:

  • Using a stand mixer blend together all but the fruit. You want a fairly thin consistency, but not as thin as crepe batter. Add more buttermilk or flour as needed. Make a plain test pancake first, it should be about 1/3 of an inch thick.
  • Preheat a griddle and wipe a used butter wrapper on the griddle
  • Test heat by dropping a drop of water on it, it should immediately bounce.
  • Pour two pancakes at a time unless you have a double size griddle.
  • As soon as you have poured them on to the griddle, generously drop berries and pomegranate all over the top of the pancakes.
  • When the pancakes start to have air bubbles, it is time to flip.
  • Continue cooking till the bottom of the pancake is golden. You can lift the edge to check. This should take 1-2 minutes.

Pomegranate pancakes


The Ultimate Beef Stroganoff From Scratch

Standard

Plated Stroganoff with roasted veggies

As Fall starts bringing us cooler weather, I start thinking of these hearty dishes from my youth (a very long time ago). My mother made Beef Stroganoff with Cream of Mushroom soup, dried reconstituted onions and anything else processed she could get her hands on. It was the age of processed foods, I really don’t blame her. My great grandmother (who was my true inspiration for cooking and gardening) on the other hand was a “scratch cook,” nothing processed and everything full fat and delicious. She was raised on an Indiana farm and spent her first 60 years there. Then they sold the farm and moved to Glendora, California where I spent almost every weekend with her till I was 14. I never saw her use a recipe and Beef Stroganoff was probably her most exotic meal. I added a few of my personal touches to this, she never used smoked paprika and  I don’t think she ever used buffalo or sherry. She made her noodles from scratch and we would roll them out with the same old rolling pin I use today. This is an easy recipe and you can take out some of the fat by using milk where I used cream and if you really want to you can use low fat sour cream or yogurt…. but I suggest that you try it this way first. It is a “splurge meal.”

Ingredients:

  • About 1 pound of beef, you can use sliced sirloin, ground beef or ground buffalo like I did.
  • 3 Tablespoons olive oil
  • 1 # of crimini mushrooms (baby bella) sliced. Wild mushrooms would be great in this!
  • 3 shallots or 1 sweet onion diced
  • 1/4 cup glace (reduced beef stock (you can make this or buy it. Make it by reducing down 4 cups of beef stock to 1/4 cup)
  • 5 cloves of garlic finely minced
  • 1 Tablespoon Smoked Sweet Paprika
  • 1 stick of butter
  • 1/2 cup of flour
  • 2 cups cream or milk (I used cream)
  • 1/4 cup sherry
  • 1/2 of a nutmeg grated (about a teaspoon)
  • 1 cup sour cream
  • Egg noodles cooked and buttered with 2 tablespoons of butter and 3 TBS fresh minced parsley

Method:

  • In a large saute pan or wok add beef and olive oil and start to brown
  • When the meat starts to brown add the onions & mushrooms till slightly golden
  • Clear a hot spot in the pan and add garlic, stir in
  • Add the glace and paprika then put on a very low simmer.

Strog 1


LDEI Pinning and scholarship 019

Make the cream sauce:

  • In a 4 qt sauce pan, melt the butter and then stir in the flour with a whisk
  • Add the cream/milk and heat as it thickens
  • Add the Sherry & Nutmeg and stir again.

cream sauce


We are ready for STROGANOFF! Pour the cream sauce into the pan with the beef and mushrooms. Heat till almost bubbling, then add the sour cream and stir till the sauce is all one color. Remove from heat. Serve over the noodles with chopped fresh herbs. Parsley, chervil or thyme all go well with this. I served it with roasted Brussels sprouts and Vidalia onions. This serves 4 we had leftovers for two nights.

Strog stirring in

Smoked Pork Butt Porchetta Style

Standard

DSC_0085

This is one of the most delicious recipes and the meat can be used in so many ways after the original meal. You can make pulled pork and porcini gravy over grits/polenta, pulled pork sandwiches with BBQ sauce, tacos, as a topping for fresh pasta, empanadas, tostados and tamales among other things. The spices in the porchetta filling are distinctly Latin and permeate the meat along with the smoke. Keep in mind that “Latin” includes Italy as well as Latin America. If you do not have a smoker, you can get the flavor by Braising the butt with liquid smoke and beer in a slow cooker or oven before you add the bourbon and do the second braise.

I have not posted in several weeks. I had a knee injury that kept me from doing a lot of cooking. It is getting better or at least the cortisone injection is making it feel that way. It is good to be able to stand for more than a few minutes again. Meanwhile the Low Country is in it’s early summer glory after we suffered through an unusual plant killing winter. It is so great to see green and blooms again.

Smoked Butt Porchetta Style

Ingredients:

  • A large, well marbled pork butt (shoulder) with the fat on one side. Bone in is fine.
  • 1 large bunch of flat leaf parsley
  • 1/2 cup cumin seeds
  • 1/2 cup fennel seeds
  • 1/2 cup corriander seeds
  • 12 cloves of garlic
  • Olive oil
  • 1 Cup of Bourbon for braising

Method:

  • Put the seeds in a dry non stick pan and toast till you start to hear them pop. Remove and allow to cool

Porchetta seeds

  • In a food processor place the parsley, garlic, cooled seeds and a drizzle of olive oil. Pulse till a thick paste is developed. You may need to add more oil to make a paste.

Porchetta seeds.in blender

  • Place one inch deep and wide slits all around the meat about 1″ apart.
  • Fill each slit with the paste. If there is any paste left, rub it all over the meat.

porchetta ready for smoker

  • Place the butt fat side up in the smoker on lowest temperature. I used apple wood this time, but I often use maple or cherry.
  • Smoke for 8 hours do not let the heat get higher than 250.

Porchetta in smoker

  • Remove to a dutch oven or slow cooker pour the bourbon over the meat and cover. Bake on lowest temperature the oven will go to for another 8 hours or if using a crock pot, leave the lid slightly ajar. Cook on low for 10 hours.

DSC_0085

I made a gravy using porcini mushrooms the drippings from the meat (removed fat by chilling) and some cornstarch. For the first meal I served it with polenta/grits and it was delicious. Then on the next day we had pulled pork sandwiches and a few days later, we are having pulled pork tacos!

Bucatini two ways!

Standard

Bucatini

Bucatini is one of my favorite pastas. It is a long noodle (#6) and it is hollow. This makes a chewy and delicious pasta dish. The first method is with bread crumbs, garlic, olive oil and herbs, topped with cheese and bread crumbs. The second has a sauce of butter roasted tomatoes with anchovies and garlic. Both are super fast and easy. Both have two layers of garlic flavor, utilizing fresh garlic and Vik’s Garlic Fix, one of my favorite products.

garlic

Bucatini with breadcrumbs

Bucatini with Bread Crumbs and Garlic, serves 4

Ingredients:
1 cup fresh bread (Italian or sourdough is best for this) crumbs toasted in a pan with 2 TBS butter
10 cloves garlic, chopped
2 TBS Vik’s Garlic Fix
1 TBS fresh cracked pepper
1/4 cup olive oil
1 bunch of fresh parsley or 1/4 cup dried parsley
crushed red pepper flakes to taste
1/4 cup parmigiana, grated
1/2 package bucatini pasta, cooked al dente

Method:

garlic and oil

The sauce is made as the pasta cooks. While your pasta is boiling place the olive oil, Vik’s and the red pepper in a frying pan and sear till the garlic is soft and lightly browned.

breadcrumbs

When the pasta is done strain and toss with the sauce. Add salt and pepper to taste. Then add the cheese and top with bread crumbs and parsley! It is delicious!

Bucatini with breadcrumbs
Next method: Butter Roasted Tomato Sauce, serves 4

DSC_0026

Ingredients:

8 cloves of garlic
1 TBS Vik’s Garlic Fix
2 cups cherry tomatoes
1 28 ounce can of chopped tomatoes (and juice)
6 small anchovies in olive oil
1/4 cup Sweet Onion Sugar
2 Tbs Italian Herb Blend
6 Tablespoons of butter cut into small pieces
Salt and Black pepper
1/2 package Bucatini Pasta, cooked al dente

Fresh Italian Parsley or Basil for garnish.
DSC_0024

In an oven proof pan with deep sides, place all ingredients. Roast at 350 degrees for 40 minutes. After removing from the oven, smash the garlic, tomatoes and anchovies with a fork to achieve a thick chunky sauce. Toss half of the sauce with the bucatini and a ladle of pasta water. Then dish up and put remaining sauce on the pasta. Garnish with the fresh herbs.

DSC_0035

Homemade Egg Rolls!

Standard

rolls plated

There are many plays on the egg roll. This one is perhaps the “classic” to most Americans, as it is the type we grew up with. A crispy egg noodle exterior, filled with savory flavors and lots of interesting veggies. You do not have to follow an exact recipe, play around with different fillings, different herbs and all kinds of sprouts and greens. The Vietnamese make them with a rice flour wrap. Spring rolls are the same concept except uncooked, those utilize the rice flour wraps soaked in water to soften them.

OK… back to the basic egg rolls. This is so easy and everyone LOVES these! You will never buy those frozen ones again!

I like to use pork sausage, you can also chop up some cooked shrimp or chicken.

Veggies:

Finely chop some of the following (you choose the things you like):

  • Carrots (I shred mine)
  • Celery
  • Shallots
  • Garlic
  • Water chestnuts
  • Mushrooms
  • Cilantro
  • Napa cabbage
  • Red bell pepper
  • Daikon radish
  • A bit of lemongrass
  • A bit of fermented black beans (optional)

Not so chopped goodies:

  • Mung bean sprouts
  • Pea sprouts
  • Thin slices of tofu

Method:

In a hot wok or skillet brown the sausage (or other meat) once browned toss in the veggies and saute. Your mixture should be 1/2 veggies and 1/2 meat. Add some Hoisin, Fish Sauce or Oyster Sauce, just enough to moisten (I prefer the hoisin). Cool. & Chill the filling for 30 minutes.

Filling

Now comes the fun part! Let’s Roll! In four steps you roll up the egg rolls. Brush on an egg wash (1 beaten egg with 1 Tbs of water) on all seams as you fold.

Roll 1

roll 2

roll 3

roll 4

After they are rolled, place on a plate or if you are making a lot, on a tray.

rolls done

If you are frying, heat 4″ of canola or rice bran oil to 350 degrees and fry till golden brown on both sides (about 5 minutes). Drain and serve hot.

If you are baking, spray a baking sheet with oil, then place the egg rolls on the baking sheet. Preheat the oven to 375. Then bake for about 25 minutes, till golden and crispy.

For sauces, you can use many different sauces, the easiest are prepared Duck Sauce, Hoisin Sauce or Sweet Chili sauce. All are available in most any grocery stores. If you are doing the vietnamese version, it is worth it to find a recipe for Nuoc Cham. Here is my friend Andrea Nguyen’s recipe.

These are better when freshly cooked. The wraps and filling will last at least 10 days in the fridge. You can crisp up leftover cooked rolls in a 350 degree oven for 10 minutes. You can also make the rolls before cooking and freeze them on a baking sheet. Once frozen, just put into freezer bags and they will be ready for your next party. Fry or bake as directed.

The Best Lobster Bisque

Standard

Bisque 2

I make this every time we get live lobsters, which is only a few times a year. Over the years I have tweaked this. I always have to buy an extra lobster or two tails to add some meat to the soup. It is the best soup I have ever tasted. While it is rich, a single bowl and some bread make a fine supper with champagne.

Lobster

Lobster Bisque 
Serves 4

Ingredients:

  • 3 1- 2 pound live lobsters

For the stock:

  • Lobster shells
  • 1 onion quartered
  • 2 carrots
  • 2 cups of lobster cooking water
  • Water to cover shells

For the Bisque

  • 3 tablespoons olive oil
  • 1 onion, large dice (I use a sweet onion like Vidalia)
  • 1 large celery stalk, rough chopped
  • 1 large carrot, sliced
  • 12 garlic cloves, peeled
  • 20 grape tomatoes (or one large tomato rough chopped)
  • 2 tablespoons dried tarragon
  • 2 tablespoons dried thyme
  • 2 bay leaves
  • 8-10 whole peppercorns
  • 1/2 cup brandy
  • 1/2 cup dry Sherry (plus more for serving)
  • 4 cups lobster stock
  • 1 small can tomato paste
  • 1 cup whipping cream
  • 2 teaspoons cornstarch
  • 1 tablespoon water
  • Lobster Stock (about 4 cups)
  • Chives and fresh black pepper for serving

Method:

To make stock:

  • Bring large pot of water to boil.
  • Add 1/4 sea salt.
  • Add lobsters head first and boil until cooked through, about 15 minutes. Using tongs, transfer lobsters to large bowl.
  • Reserve 2 cups cooking liquid. Cool lobsters
  • Working over large bowl to catch juices, cut off lobster tails and claws. Crack tail and claw shells and remove lobster meat. Coarsely chop lobster meat; cover and chill. Coarsely chop lobster shells and bodies; transfer to medium bowl. Reserve juices from lobster in large bowl.Or you can serve the lobsters and save the shells, reserving extra meat for the bisque.
  • In a clean pot add shells, onion, carrot and reserved cooking liquid. Add enough water to cover the shells with an additional 2″ of water.
  • Cook low and slow for several hours (I have a simmer burner and let it simmer over night), until the stock has reduced to the level of the shells. Strain over a large pot.
  • You can cool and save this in the freezer or refrigerator or use straight away.
  • Discard solids

Bisque:

Bisque beginning

  • Heat olive oil in heavy large pot over high heat.
  • Add onion and next 8 ingredients. Boil until almost all liquid has evaporated, about 4 minutes. *Note, if you are using tails for the meat, put them in with veggies and cook till meat is white, about 4 minutes Use one tail per serving. 
  • Add lobster stock
  • Simmer 1 hour.
  • Remove bay leaves
  • Use a stick blender to puree
  • Strain soup through sieve set over a pot, pressing firmly on solids. Whisk tomato paste into soup. Add sherry and cognac.
  • Simmer until soup is reduced to 3 cups, about 15 minutes. (Can be prepared 1 day ahead. Cover and refrigerate at this point)
  • Add cream to soup and simmer 5 minutes.
  • Dissolve cornstarch in 1 tablespoon water.
  • Add to soup and boil until slightly thickened, about 2 minutes. 
  • Ladle soup into bowls and top with a pile of lobster meat, some fresh chives, freshly cracked black pepper and a drizzle of sherry. 

Best Fried Green Tomatoes… Southern Bliss

Standard

Fried Green Tomatoes

I never even thought of Fried Green Tomatoes as a recipe until a few people asked me how to make them. They are super easy and very tasty when done right. My great grandmother used to make them, though hers were made with just flour, not the combo of flour and cornmeal that I use now. This method if dredging, dipping and dredging again is the secret to fried chicken and most any coated fried food. The final dredge changes, anything from seasoned flour to panko, but the method stays the same. In the fall green tomatoes are pulled from the vines before first frost, but here in the south, people treasure them all year and green tomatoes are sold in our farmer’s markets. To keep them from ripening, store in the refrigerator till ready to use. They will keep several weeks. I never refrigerate ripe tomatoes, as that kills the sweetness.

fried green tomatoes

Set up a dredging station:

Pan 1: All Purpose flour

Pan 2 :1 cup of buttermilk 1-2 eggs whisked in

Pan 3: This is where you get a little creative:

Then slice up the green tomatoes about 1/2 inch thick. This thickness allows for a crispy crust and tender interior.

Heat canola or peanut oil to 350 degrees in a frying pan, about 1  1/2 inches deep.

Dredge the tomato slices in the flour, then the buttermilk mixture, making sure that the entire slice is covered in liquid.

Finally dredge the slices in the seasoned flour, making sure that all surfaces are covered.

Place in the frying pan, taking care not to crowd. fry till crispy and golden brown on each side and remove to a rack to drain. Repeat.

They can be served with a remoulade sauce, sweet chile sauce or put them on a BLT! They are even good cold.

Fried Green Tomatoes and Remoulade

Big Daddy Does Pho

Standard

Pho 3

Big Daddy makes a few cooking attempts to ease my busy schedule. Last night he hit a homerun. Pho (pronounced FA), the simple (yet complex) Vietnamese Street food charmed him when we lived in Hawaii. He is not one for exotic flavors, so this surprised me a bit. Since then we have been to several restaurants here in Charleston that serve Pho. He decided to make it and it was an astounding winner. We paired it with a Belgian Ale and that was a fantastic match too. We had some leftover rare beef (tri-tip) so he froze it and sliced it thinly. I usually ask for my meat on the side when ordering Pho in restaurants, I don’t like it over cooked. We have enough broth for at least two more meals.

ready for soup

Pho 

INGREDIENTS:

Soup
4 quarts beef stock (homemade is best)
1 large onion, sliced into rings
6 slices fresh ginger root or galangal if you can get it
2 small stalks of fresh lemon grass tied in a knot
1 pound sirloin tip, cut into thin slices
1 (8 ounce) packages dried rice noodles
 
Garnishes and Sauces
1/2 pound bean sprouts
1 cup fresh Thai basil leaves
1 cup fresh mint leaves
1 cup loosely packed cilantro leaves
3 fresh jalapeno peppers, sliced into thin rings
2 limes, cut into wedges
Hoisin sauce
Sriracha (Rooster) sauce
Fish sauce
METHOD :
1. In a large soup pot, combine broth, onion, ginger, lemon grass, star anise, cinnamon, and peppercorns. Bring to a boil, reduce heat, and cover. Simmer for 1 hour.
2. Arrange bean sprouts, mint, basil, and cilantro on a platter with chilies and lime.
3. Soak the noodles in hot water to cover for 15 minutes or until soft. Drain. Place equal portions of noodles into large soup bowls, and place raw beef on top. Ladle hot broth over noodles and top with beef. Pass garnishes and sauces.

Pho 2