For me, it is a right of passage of sorts. I remember back over 30 years ago when as a young bride in the Low Country we had just moved in to a new house on the St. Helena Sound. my neighbor brought me over a little brown paper sack filled with yellow squash. She told me to go to the Piggly Wiggly and buy a “mess” of Vidalia Onions and explained this very simple recipe. Every spring I make this and think of the gift that Belle gave me. These two vegetables which appear at the same time every spring in the South will always be a perfect pairing in my mind. You can use any sweet onion to make this. Fortunately I had the amazing luck to come upon a shipment of Vidalias here in Hawaii. I grabbed them up and have been making all kinds of good things with them. But when I was at the farmer’s market and saw this yellow squash, I had to make this.
The recipe is embarrassingly simple and I am sure you will love the velvety texture that is the result.
Vidalia Onions and the First Yellow Squash of the Season
3 Vidalia or other sweet onions sliced
3 tender yellow squash sliced
3 cloves of garlic finely minced
Olive oil
Salt and Pepper to taste
Freshly grated Parmesan
In a generous skillet, heat the olive oil and put in the squash in an even layer. Brown and turn.
Add the onions and stir, sautee till the onions start to sweat.
Clean a hot spot in the center of the pan and add the minced garlic. Stir again.
When the onions turn translucent and just start to brown, add the cheese and stir till it starts to melt.
The Cupcakes Ingredients 1 1/2 cups all-purpose flour 3/4 cup unsweetened Dutch-process cocoa powder 1 1/2 cups sugar 1 1/2 teaspoons baking soda 3/4 teaspoon baking powder 3/4 teaspoon salt 2 large eggs 3/4 cup buttermilk 3 tablespoons vegetable oil 1 teaspoon pure vanilla extract 3/4 cup warm water
Directions Preheat the oven to 350°F. Line mini muffin tin with paper liners. Whisk together flour, cocoa, sugar, baking soda, baking powder, and salt. With mixer on low speed, add eggs, buttermilk, oil, extract, and the water; beat until smooth and combined.
Spoon the batter into liners about two-thirds full. Bake approximately 15 minutes, or until tester comes out clean. Transfer tins to wire racks and allow to cool for 10 minutes; turn cupcakes onto racks and let cool completely. Cupcakes can be stored overnight at room temperature, or frozen up to 1 month in air tight containers.
To finish, use a paring knife to cut a cone-shaped piece (about 1/2 inch deep) from the center of each cupcake and throw away the pieces (or eat them). Spoon 1 to 2 teaspoons warm Salted Caramel Filling into each hollowed-out cupcake. You will notice the caramel will sink into the cupcake a little, just fill it up a bit more. Sprinkle a pinch of sea salt over filling.
Use a pastry bag with a medium open-star tip and pipe Dark Chocolate Frosting onto each cupcake, swirling tip and releasing as you pull up to form a peak. Garnish each cupcake with a pinch of sea salt. Cupcakes are best eaten the day they are filled and frosted. Store at room temperature in airtight containers – do NOT refrigerate.
Salted Caramel Filling Ingredients: 2 1/2 cups sugar 2/3 cup water 1 tablespoon light corn syrup 3/4 cup heavy whipping cream 2 1/2 teaspoons sea salt, preferably fleur de sel
Directions Heat sugar with the water and corn syrup in a heavy saucepan over high, stirring occasionally, until syrup is clear; clip a candy thermometer to side of pan and stop stirring.
Cook until syrup comes to a boil, washing down sides of pan with a wet pastry brush as needed. Boil, gently swirling pan occasionally, until mixture is caramelized and just reaches 360°F. Remove from heat and slowly pour in cream; stir with a wooden spoon until smooth. Stir in sea salt.
Use immediately; if caramel begins to harden reheat gently until pourable.
Dark Chocolate Frosting Ingredients: 1/2 cup plus 1 tablespoon unsweetened Dutch-process cocoa powder 1/2 cup plus 1 tablespoon boiling water 2 1/4 cups (4 1/2 sticks) unsalted butter, room temperature 3/4 cup confectioners’ sugar, sifted 1/4 teaspoon salt 1 1/2 pounds best-quality semi-sweet chocolate, melted and cooled
Directions: Combine cocoa and boiling water, stirring until cocoa has dissolved.
With electric mixer on medium-high, beat butter, confectioners’ sugar, and salt until pale and fluffy. Reduce speed to low. Add melted and cooled chocolate, beating until combined and scraping down sides of bowl as needed. Beat in the cocoa mixture.
Frosting can be refrigerated up to 5 days, or frozen up to 1 month in an air tight container. Before using, bring to room temperature and beat on low speed until smooth again. Pipe onto cupcakes.
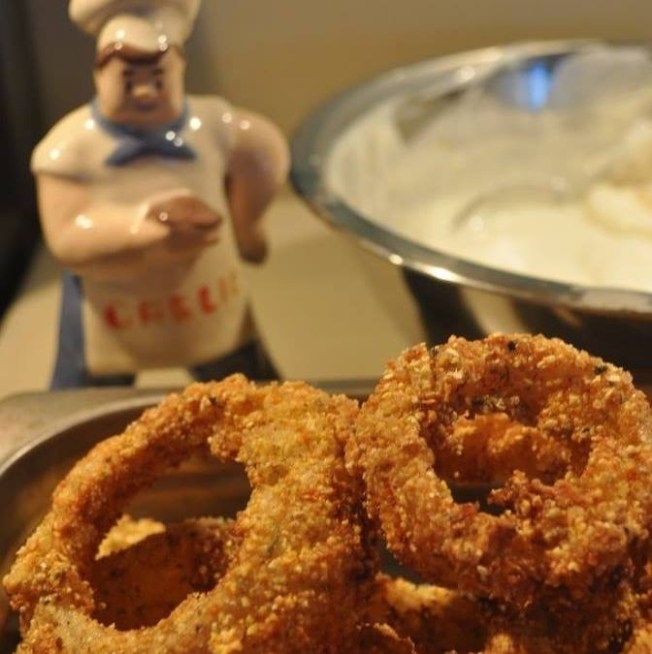
It is that magical time of year when Vidalia onions appear in the markets. Yes, even here in Hawaii, home of the Maui Onion (which is almost as sweet) we get Vidalias. I have been making cornmeal crusted onion rings for a long time, but I decided to change it up a little by using Greek yogurt instead of buttermilk to soak my onion rings in and to add Furikake to the Polenta. In this recipe I used a course ground Polenta which added a lot of texture. You could also use stone ground grits for this. Furikake is a Japanese seasoning used to spice up plain rice. I use it for lots of things and love adding it to the panko crumbs when making fish. My favorite Furikake is wasabi, sesame and nori. It ads little pops of flavor in the crust.
Ingredients:
2 cups of Greek Yogurt, thinned with 1/2 cup of milk
4 large Vidalia onions
2 cups coarse polenta
1/2 cup all purpose flour (or rice flour if you are gluten free)
1/4 cup Firikake
plenty of fresh cracked pepper
1 teaspoon of salt
Peanut oil for frying
Method:
Slice onions into thick slices, place the slices in the bowl of yogurt and milk and allow to rest for 30 minutes
Mix all other ingredients except oil in a shallow container
Heat oil to 350
Pull out slices of onion and shake off excess yogurt but allow a bit to remain
Dredge the onion slices in the breading, making sure it adheres to the onion slices
Fry the onions, 6 or so slices at a time for about 3 minutes, draining on a grid.
Serve immediately
I like to make a chipotle mayo for dipping. In a small blender mix 1 cup of mayonnaise with half a can of chipotles. (freeze remaining peppers for another use) Blend till they are combined.
In just 30 minutes you can whip this amazingly flavorful soup up. It is good hot or chilled. I served it with Spanakopita (click for the recipe).
INGREDIENTS
3 cups chicken stock (homemade preferred) if you are using box stock or broth, simmer it down and reduce it by half (this means you need twice as much)
1/4 cup rice or orzo (optional, but I like it)
4 egg yolks
2 egg whites
Freshly squeezed juice of 4 Meyer lemons (if using another type of lemon, use one less)
1/4 teaspoon sea salt
2 tablespoons minced dill, mint, chives or fennel
Lemon zest from one lemon
One thin lemon slice for each serving
METHOD
Add rice or orzo to the chicken stock, bring to a boil and reduce to a simmer till rice (20 minutes) or pasta (10 minutes) is cooked once cooked add 1/2 of the lemon juice
Put egg whites in a container to be whipped (I use a stick blender with a whip attachment, but you can use a food processor or hand mixer to whip the whites)
Place yolks in a mixing bowl
Whisk 1/2 cup of the hot chicken stock/rice into yolks until well blended, then add the remaining stock/rice mixture stirring till blended
Whip the egg whites until soft peaks form
Marry 1/2 cup of the stock/rice/yolk mixture to the egg whites, then fold that mixture into the stock/rice/yolk being careful not to deflate.
Taste for salt and lemon juice, adding more as needed. Ladle into warm bowls (or allow to chill and serve in stemmed glasses), sprinkle with herbs and lemon zest and add one lemon slice.
Yield: 4 to 6 servings. This does keep well in a covered container, but should be used in 1-2 days and be very careful when re-heating not to allow it to boil.
This recipe came about, as many do, with an inspiration from another cook. My friend Caterina Borg who has the fabulous food blog Good Food Gourmet. She made this post back in October about poached pears stuffed with Brie. She was inspired by another food blog Palachinka. Here is Palachinka’s original postwith a different spin on the theme. Palachinka’s post was inspired by a recipe in Sale&Pepe magazine, Serbian issue for December 2009.
I had planned to make this as an appetizer, but could not find small pears, so I made it as a first course, served in bowls with a reduction of the poaching liquid spooned over. This would also go great on some lightly dressed greens.
My spin was of course quite different, from the poaching liquid to the finish, and yet all three of our dishes have the same basic components, pears, cheese and bacon. What is not to love? Here is my version of the concept which dazzled my dinner guests last night:
Ingredients:
6 pears
Enough wine to cover 6 pears in a pot (2-3 bottles). I used prosecco, but you could use any wine you like. Port is great for this as would be a merlot. Each with their own distinctions.
Aromatics: I used fennel, pink pepper corns, thyme, cinnamon sticks, big slices of orange peel and cloves. Star anise would be nice this too.
A small wheel of Brie Cheese (You will have leftover cheese.)
12-14 slices of bacon
1 1 /2 cups brown sugar mixed with 2 teaspoons of Chipotle powder
Method:
Peel pears and place in a large pan so that they are in a single layer.
Cover with wine and add aromatics
Bring to a boil and then reduce heat and simmer for 15 minutes, remove pears to another bowl for cooling.
Turn the burner up to a rolling simmer and reduce the poaching liquid by half.
When pears are cool, cut in half, scoop out the center with a melon baller and fill the cavities with peeled brie, then put back together.
Wrap each pear with 2 slices of bacon, if you have a really large pear, you might need three slices. Hold together with toothpicks.
Roll the pears in the seasoned brown sugar
Place standing up on a silpat or parchment lined baking sheet and bake at 400 degrees for 15 minutes, or until the bacon is crispy.
Place each pear in a bowl, mine were laying down, but you could place them standing up too. Spoon the remaining poaching liquid with the aromatics over each pear. Serve with a sharp knife so the bacon is easily cut through.
Gelato is ice cream’s smoother more flavorful Italian cousin. In Italy there are gelaterie shops everywhere. The trend came to the US several years ago, but there are still many people I meet that are not familiar with gelato. It is best made in small batches. It has less butterfat than most ice cream and there are a few secrets to making it smoother. Most recipes for gelato use only egg yolks, no whites. The yolk works as a stabilizer in the process. The other secret is to cook the custard and then after straining let it sit for for several hours after pasteurization is complete for the milk proteins to hydrate, or bind. This hydration reduces the size of the ice crystals, making a smoother texture in the final product.
I have an Italian gelato machine. But you do not have to have one to make good gelato. It does help if you have a machine which stirs while refrigerating, but you can still get good results with an old fashioned ice cream machine. My machine is made by Lusso and I call her Lucille.
Here is the recipe:
Ingredients:
2 cups whole milk
2 cups heavy cream
1/3 cup dried culinary lavender flowers
Zest of one lemon in large strips (use a vegetable peeler not a zester)
7 egg yolks
1 cup sugar
dash salt
1/2 teaspoon vanilla
Purple food coloring paste (buy this in cake decorating section of a craft store) optional
Method:
Bring milk, lemon zest and lavender almost to a boil
Turn off heat and allow to sit for 1 hour
Strain and discard lavender & lemon peel
Add cream with a whisk
Reheat strained milk & cream until bubbles form around edge of the pan
Beat the egg yolks with with sugar and a pinch of salt in a stainless steel bowl that will fit over a saucepan of water. Beat vigorously until the mixture is yellow and creamy (about 3 minutes)
Add a ladle of the hot milk/cream to the egg/sugar mixture and continue to whisk, then add the remaining milk/cream mixture very slowly
Maintain a simmer in the bottom of the double boiler, do not allow it to come to a rolling boil
Beat by hand or with a mixer while cooking for about 15 minutes, do not allow it to boil
When the back of a wooden spoon is coated with the mixture and you can draw a line with your finger it is ready.
Stir in the vanilla and pour through a strainer into another bowl that will fit into a larger bowl fitted with ice
Whisk in the coloring if you want to use it
Place plastic wrap over the entire top of the mixture, touching it all the way around. This creates a seal and will not allow a skin to form.
Place the bowl with the mixture in it into the bowl of ice and allow to rest until all of the ice melts.
At this point you can place it in the refrigerator to chill further, as long as over night.
Process according to your machine’s directions. Put into plastic containers and freeze or serve immediately
You might want to try one of my other favorite gelato recipes: Salted Caramel Gelato pictured below:
This bread pudding is a sort of a “two fer”, as it also includes a recipe for really great Irish Soda Bread. Soda Bread does not use yeast, it somewhat resembles a very large biscuit. It is easy to make and you will only use about half of the loaf for this recipe. Try toasting the leftovers with butter and jam.
It is March and we did an Irish Fine Dining Dinner for St. Patrick’s Day. I was not the host, so I only did three dishes, the first of which I am sharing with you today.
Ingredients:
For the Soda Bread:
2 Cups all-purpose flour + 2 tablespoons for dusting
1 teaspoon baking soda (be sure it is fresh)
½ teaspoon sea salt
½ teaspoon fresh cracked pepper
2 Tablespoons fresh dill chopped
1 tablespoon Caraway seeds
1 Cup of buttermilk (shake before pouring)
2 tablespoons unsalted butter, melted
For the Pudding:
4 large fresh eggs
2 cups whole milk
½ cup of heavy cream
½ teaspoon sea salt
½ teaspoon freshly ground pepper
2 cups grated Irish Cheddar Cheese
¼ cup grated Parmigiano-Reggiano
Paprika
6 6 ounce ramekins or a 2 quart baking dish
Method
FOR THE SODA BREAD:
Preheat oven to 350°
In a food processor add the flour, baking soda and salt. Pulse a few times. Add the caraway, pepper and dill, pulse a few more times. Add the buttermilk and butter. Pulse again till it just begins to form a ball.
Place on a lightly floured surface and gently knead into a smooth ball and flatten into a 6 inch flattened round. Allow to rest for 5 minutes. Place on an ungreased baking sheet.
With a very sharp knife, cut an X in the top of the dough about ½ inch deep. This assures even cooking.
Use a small sieve to dust the top with additional flour.
Bake on middle shelf (I also use a baking stone for even heat) for 35-40 minutes or until golden brown and a hollow sound is made when tapped.
Cool on a rack. This can be done one day ahead.
FOR THE PUDDINGS:
Preheat oven to 350°
Spray the ramekins with olive oil
Cut ½ of the bread into cubes and place them in the ramekins about half way up. Reserve remaining cubes.
Make the custard by whisking the eggs, milk, cream, salt & pepper. Stir in the cheeses. Pour into a pitcher.
Place the ramekins in a hotel pan or 9 X 13 baking dish, cover the bread with custard, making sure some cheese goes in. Then add additional cubes to the top of the ramekin 3/4 of the way from the top. Pour all of the mixture into the ramekins, filling them to the top. Sprinkle with a little paprika. Add about 2 inches of water to the hotel pan and bake 35-40 minutes. They are finished when a knife is inserted and comes out clean.
Remove from the water and place on a towel or rack and allow to rest for 15 minutes or more.
On Saturday I got to experience something really special. The Puna Hongwanji hosted a professional soba maker from Japan to teach a workshop on making soba. Mr. Yamaguchi came from Fukui Japan to teach us his craft. And I use the term teach loosely, as it takes an entire year of making soba three times a day before you can actually be considered a professional. In Japan, soba and other noodles are made both by hand and also by manufacturing equipment. The handmade noodles are revered and sought out. Mr. Yamaguchi’s shop is one where the noodles are made daily, every day of the week, every week of the year by his wife, himself and a worker. He and his wife take separate vacations so that the shop never closes. In the shop, the soba master works behind a glass cage so that the customers are assured they are getting the freshest handmade product. Often there will be a slightly misshapen piece of noodle added to each bowl so that the customers are once again assured of a completely handmade product.
Before you read further, here is the video:
The heart of soba making is in the region of Japan called Fukui where a long tradition of growing and harvesting buckwheat is centered. Buckwheat is not a grain, but the seed of a flower.
The 54 year old soba maestro has traveling equipment set up that he stores in Hawaii because he comes here so frequently to do demonstrations. His equipment involves a large wooden shallow bowl for mixing the buckwheat flour and water that comprise the noodle dough, a 3’ X 3’ rolling surface which comes apart in three pieces, a 3’ X 1’ cutting board with 2 little folding legs to hold it onto the rolling surface, preventing slipping, an interesting device that has a hand guard for cutting the noodles and a very large long steel cleaver that is used to precisely cut the noodles. His final 2 pieces of equipment are the rolling pins, two long dowels about 1 ½ inches in diameter and 3’ long. Each piece of his equipment has a handmade quilted bag to protect it when not in use.
Soba (そば or 蕎麦?) is the Japanese name for buckwheat. It is synonymous with a type of thin noodle made from buckwheat flour, and in Japan can refer to any thin noodle (in contrast to thick wheat noodles, known as udon). Soba noodles are served either chilled with a dipping sauce, or in hot broth as a noodle soup. It takes three months for buckwheat to be ready for harvest, so it can be harvested four times a year, mainly in spring, summer, and autumn. In Japan, buckwheat is produced mainly in Hokkaido. Soba that is made with newly-harvested buckwheat is called “shin-soba”. It is sweeter and more flavorful than regular soba.
Since soba also means “next to,” there is a unique Japanese custom called “hikkoshi-soba (moving-in noodles).” People who have just moved into a new neighborhood, give their new neighbors soba while introducing themselves.
On New Year’s Eve there is a custom to eat “toshikoshi-soba (year-crossing noodles).” Because soba is fine and long, people eat them to wish for a long life. This became widespread in the Edo period.
The style of Mr. Yamaguchi’s noodles is is Echizen oroshi soba, or Summer Noodles. They are served cold with bonito flakes, spring onions and a sauce made of freshly grated daikon that was mixed with seasoning. The cooking liquid is also served alongside as a tea. The seasoning for Echizen oroshi soba is usually made with soy sauce, mirin, water and sugar, but in this case because Mr. Yamaguchi believes that the daikon in Hawaii is sweeter than in Japan, he brought a bittering agent to counteract that sweetness.
Mr. Yamaguchi does not speak English, so an interpreter from the Puna Hongwanji was available to translate his meticulous instructions. First the dough is made. This process takes about 30 minutes. Special flour made from the heart of the buckwheat is ground into flour. Mr. Yamaguchi brought his custom made flour in pre-measured bags. Each bag made one batch of soba. He had to make 3 batches to feed the 40 people attending the class. He starts by emptying the bag of soba flour into the bowl and adding a precise amount of water a tiny bit at a time. He works the dough by hand assuring that the hydration occurs evenly. As he incorporates more and more water, the dough begins to form and he kneads it over and over into a smooth and elastic dough. Finally after working the dough into complete submission, he flattens it into a disk and then starts the rolling process. The disc eventually is flattened and thinned into a square shape. This process takes another 20-30 minutes. The entire time my head was spinning as I was thinking how much easier it would be with a pasta machine to roll it out. Then when the dough is as thin as it needs to be, the square is folded over three times with extra flour to keep it from sticking and the cutting begins. The noodles are quite thin, thinner than the commercially made soba that I have experienced. Each bunch of noodles consists of 28 cuts. The noodles are then shaken to rid the excess flour and laid out on a sheet to rest. At this point you could cover the noodles and refrigerate for up to three days, but it is best to use them fresh.
A large wok-pot on a commercial wok burner was filled with water and set to boil. Once boiling the noodles are added and cooked using a long set of chopsticks to occasionally stir. In about 5 minutes a noodle is removed and tasted and when the noodles are at the ready they are placed into a colander and immediately dunked into ice water and “washed”. Then they go through the process a second time in fresh ice water. They are then immediately drained and served in bowls. The daikon in sauce goes on top, then some green onion slices and finally a generous hand full of bonito flakes.
A cup of soba noodles has 113 calories. That compares with about 200 calories for a cup of white-flour pasta. The calories in soba noodles still are made up mostly of carbohydrates, at 24.44 g. That compares to about 40g carbs in a cup of regular pasta. There are 5.77g protein in soba noodles and 0.11g fats. About 92 percent of the calories in the noodles come from carbs, 20 percent from protein and 1 percent from fat.
If your are interested in learning more about the Puna Honwanji, you can go to their website or facebook page.
This fresh clean salad is vegan and gluten free. It is easy to make and has some really interesting flavors. I sometimes add pomegranate during the holidays. The recipe is adapted by one on Epicurious.com. I first tasted it when my friend Janet Montrose brought some to a party at our house. I love the light crispy fresh salad so much that I make it often. It is best eaten immediately after making.
Here is the very easy recipe:
Celery Salad
1/2 cup fresh lemon juice (I use Meyer because we can get them all year here)
2 large Granny Smith apples, peeled, quartered, cored; each quarter cut into 2 wedges, then thinly sliced crosswise into triangle shapes
3/4 cup walnuts, toasted, chopped
Whisk first 3 ingredients in small bowl to blend. Gradually whisk in oil. Season vinaigrette with salt and pepper.
Trim celery leaves and chop. Thinly slice stalks on deep diagonal. Place celery pieces in bowl of cold water. (Vinaigrette, celery leaves, and celery pieces can be prepared 1 day ahead. Cover separately and refrigerate.)
Drain celery; pat dry with paper towels. Combine celery, celery leaves, apples, and walnuts in large bowl. Add vinaigrette and toss to coat. Taste and season salad to taste with salt and pepper if needed.
This would make an ideal Valentine’s dinner dish. I like to serve soufflés in individual dishes. This recipe makes two generous soufflés. I used ramekins that are 5″ across. For dinner parties I like to double this recipe and use smaller ramekins. I served the soufflés with a sauteed chicken breast and brandied cranberry sauce. They would be equally good with a large herby salad. I used my friend Ron’s eggs, straight from the backyard coop. Fresh eggs are important in this recipe. Contrary to rumors, soufflés are actually very easy to make as long as you follow the instructions and do not open the oven while cooking. I also use a ceramic oven liner that retains heat and makes for even baking. Have fun with this!
Individual Cheese Soufflés
1 teaspoon of Piment d’Espelette(optional; you may find this favorite seasoning of mine difficult to find)
3/4 cup finely grated aged Parmigiano-Reggiano cheese, plus 1/4 cup for topping (used the food processor with blade for grating the cheese)
1 tablespoon unsalted butter, at room temperature and more for coating the ramekins
2 tablespoons all-purpose/plain flour
1/2 of a nutmeg, freshly grated
3/4 teaspoons sea salt
3/4 cup whole milk
1 garlic clove, minced
1 cup finely grated semi-hard cheese such as Comté Manchego, Gruyère. I used Comté and did the food processor method for both the Comté and the Parm (but do make sure that there are no large lumps)
3 large very fresh eggs, separated + one extra white.
1 tsp freshly squeezed lemon juice (I used Meyer lemons, they are my favorite and in season now)
Get everything prepped and mise en place.
Mise en Place
Preheat the oven to 375˚F with a rack in the middle of the oven. Butter ramekins sprinkle with Parmigiano-Reggiano to coat completely all the way to the top. Shake any excess cheese out into a bowl. Place the molds in the freezer to chill.
Melt the 1 tablespoon butter in a medium saucepan over low heat. Whisk in the Piment d’Espelette , flour, nutmeg, and salt; whisking constantly, cook the flour without browning, about 5 minutes. Whisk in the milk and garlic and continue to cook, whisking, at a low simmer until the mixture is smooth and thick like pudding, about 5 minutes.
Stir in the Comté and any Parmigiano-Reggiano left over from coating the molds and cook, stirring, until the cheese melts. Remove from the heat and stir in the egg yolks, one at a time. Continue stirring vigorously with a rubber spatula to cool.
Whisk the egg whites and lemon juice in a clean bowl with a Kitchen Aid Mixer beater on medium-high until they just hold a soft peak. * DO NOT not over-whip the whites, which would give your soufflé a cloudy instead of creamy consistency.
Fold one-fourth of the egg whites into the cheese mixture with a rubber spatula, carefully turning the bowl and mixing gently until the whites are streaked throughout. Add the remaining whites and fold in but don’t overmix, which can deflate the whites.
Transfer the batter to the chilled mold and scatter the remaining Parmigiano-Reggiano over the top. Place the dish on a baking sheet/tray and set in the oven, decrease the oven temperature to 325˚F/ 165°C/, and bake until the soufflé is golden, puffed, and set but just a touch wobbly inside, 30 to 40 minutes. Serve immediately. After a few minutes a slight deflation is normal, this is why they must be served immediately for the most impact. Enjoy!
Plated. I sauteed the chicken in a little bit of butter. The chicken was massaged with Piment d'Espelette, flour and salt.


 It is that magical time of year when Vidalia onions appear in the markets. Yes, even here in Hawaii, home of the Maui Onion (which is almost as sweet) we get Vidalias. I have been making cornmeal crusted onion rings for a long time, but I decided to change it up a little by using Greek yogurt instead of buttermilk to soak my onion rings in and to add


